分类目录归档:PHP

Debian11+PHP8.2

更新系统以及添加sury库

sudo apt update
sudo apt -y upgrade
sudo apt install -y lsb-release ca-certificates apt-transport-https software-properties-common gnupg2
echo "deb https://packages.sury.org/php/ $(lsb_release -sc) main" | sudo tee /etc/apt/sources.list.d/sury-php.list
wget -qO - https://packages.sury.org/php/apt.gpg | sudo apt-key add -
sudo apt update 

安装PHP以及常用扩展

sudo apt install php8.2 php8.2-bcmath php8.2-bz2 php8.2-cgi php8.2-cli php8.2-common php8.2-curl php8.2-dev php8.2-enchant php8.2-fpm php8.2-gd  php8.2-http php8.2-igbinary php8.2-http php8.2-imagick php8.2-imap php8.2-intl php8.2-mbstring php8.2-mcrypt php8.2-memcached php8.2-memcache php8.2-msgpack php8.2-mysql php8.2-oauth php8.2-odbc php8.2-opcache php8.2-pgsql php8.2-redis php8.2-snmp php8.2-soap php8.2-sqlite3 php8.2-solr php8.2-ssh2 php8.2-stomp  php8.2-tidy php8.2-uuid php8.2-xdebug  php8.2-xml php8.2-xmlrpc php8.2-yaml php8.2-xsl php8.2-zip php8.2-zmq php8.2-raphf

PHP 7.4

sudo apt install php7.4 php7.4-bcmath php7.4-bz2 php7.4-cgi php7.4-cli php7.4-common php7.4-curl php7.4-dev php7.4-enchant php7.4-fpm php7.4-gd php7.4-grpc php7.4-http php7.4-igbinary php7.4-http php7.4-imagick php7.4-inotify php7.4-imap php7.4-intl php7.4-mbstring php7.4-mcrypt php7.4-memcached php7.4-memcache php7.4-msgpack php7.4-mysql php7.4-oauth php7.4-odbc php7.4-opcache php7.4-pgsql php7.4-redis php7.4-snmp php7.4-soap php7.4-sqlite3 php7.4-solr php7.4-ssh2 php7.4-stomp php7.4-tidy php7.4-uuid php7.4-xdebug php7.4-xhprof php7.4-xml php7.4-xmlrpc php7.4-yaml php7.4-xsl php7.4-zip php7.4-zmq php7.4-raphf

检查

php -v
php -m

参考

How To Install PHP 8.0 on Debian 11/10/9

PHP计算PDF页码

使用其他库存在计算不准确和部分压缩文件不支持问题。

安装 pdfinfo

sudo apt install poppler-utils # ubuntu debian
sudo dnf install poppler-utils # centos

安装PHP类

composer require "howtomakeaturn/pdfinfo"

计算代码

$pdf = new PDFInfo('path/to/the/pdf');
echo $pdf->pages;

参考

Windows下PHP安装Imagick扩展

查看本机PHP版本

php -v

输出

PHP 7.4.14 (cli) (built: Jan  5 2021 15:11:43) ( NTS Visual C++ 2017 x64 )
Copyright (c) The PHP Group
Zend Engine v3.4.0, Copyright (c) Zend Technologies

可以看到PHP版本为7.4,NTS(非线程安全),64位

下载扩展DLL

  1. 打开 https://pecl.php.net/package/imagick
  2. 找到最新稳定版本,点击后面的DLL
  3. 再打开的页面中,根据上面的PHP版本,选择要下载的DLL

安装

  1. 将下载的压缩文件下的php_imagick.dll放入PHP目录下的ext子目录下
  2. 将压缩文件下的其他DLL文件放到PHP目录
  3. 修改php目录下的php.ini,添加extension=imagick

PHP 5/7/8编译安装实例

PHP 5.6

PHP 5只能用openssl 1.0, curl使用7.70.0,freetype 2.6.5

./configure --prefix=/usr/local/php/5.6 \
--enable-fpm \
--enable-bcmath \
--enable-calendar \
--enable-exif \
--with-gd \
--enable-gd-jis-conv \
--enable-mbstring \
--with-pdo-mysql \
--with-pdo-pgsql \
--enable-sockets \
--enable-opcache \
--with-jpeg-dir \
--with-png-dir \
--with-zlib-dir \
--with-xpm-dir \
--enable-gd-native-ttf  \
--enable-gd-jis-conv \
--with-openssl=/usr/local/openssl-1.0

make -j 6

sudo make install

/usr/local/php/5.6/bin/php -m

PHP 7.4

./configure \
--prefix=/usr/local/php/7.4 \
--enable-fpm \
--with-fpm-user=ning \
--with-fpm-group=ning \
--with-pdo-mysql \
--with-pdo-pgsql \
--with-iconv-dir \
--with-freetype \
--with-jpeg \
--with-zlib \
--enable-xml \
--disable-rpath \
--enable-bcmath \
--enable-shmop \
--enable-sysvsem \
--enable-inline-optimization \
--with-curl \
--enable-mbregex \
--enable-mbstring \
--enable-intl \
--enable-ftp \
--enable-gd \
--with-openssl \
--with-mhash \
--enable-pcntl \
--enable-sockets \
--with-xmlrpc \
--enable-soap \
--with-gettext \
--disable-fileinfo \
--enable-opcache \
--with-sodium \
--with-webp

make -j 6

sudo make install

/usr/local/php/7.4/bin/php -m

PHP 8.1

configure \
--prefix=/usr/local/php/8.1 \
--enable-fpm \
--with-fpm-user=ning \
--with-fpm-group=ning \
--with-pdo-mysql \
--with-pdo-pgsql \
--with-freetype \
--with-jpeg \
--with-zlib \
--enable-xml \
--disable-rpath \
--enable-bcmath \
--enable-shmop \
--enable-sysvsem \
--with-curl \
--enable-mbregex \
--enable-mbstring \
--enable-intl \
--enable-ftp \
--enable-gd \
--with-openssl \
--with-mhash \
--enable-pcntl \
--enable-sockets \
--enable-soap \
--with-gettext \
--disable-fileinfo \
--enable-opcache \
--with-sodium \
--with-webp

make -j 6

sudo make install

/usr/local/php/8.1/bin/php -m

Ubuntu下PHP 7和PHP 8多版本共存以及composer指定版本

修改更新源

sudo add-apt-repository ppa:ondrej/php
sudo apt update
sudo apt upgrade

安装PHP7以及常用扩展

sudo apt install php7.4-common php7.4-cgi php7.4-gd php7.4-mysql php7.4-xml php7.4-cli php7.4-json php7.4-sqlite3 php7.4-xmlrpc php7.4-bcmath php7.4-enchant
php7.4-opcache php7.4-readline php7.4-xsl php7.4-bz2 php7.4-curl  php7.4-fpm php7.4-mbstring php7.4-pgsql php7.4-tidy php7.4-zip

安装PHP8以及常用扩展

sudo apt install php8.0-common php8.0-cgi php8.0-gd php8.0-mysql php8.0-xml php8.0-cli php8.0-sqlite3 php8.0-xmlrpc php8.0-bcmath php8.0-enchant php8.0-opcache php8.0-readline php8.0-xsl php8.0-bz2 php8.0-curl  php8.0-fpm php8.0-mbstring php8.0-pgsql php8.0-tidy php8.0-zip

composer安装以及使用

安装composer

php -r "copy('https://install.phpcomposer.com/installer', 'composer-setup.php');"
php composer-setup.php
php -r "unlink('composer-setup.php');"
sudo mv composer.phar /usr/local/bin/composer

配置composer使用镜像

composer config -g repo.packagist composer https://mirrors.aliyun.com/composer/

运行composer时指定PHP版本

php8.0 /usr/local/bin/composer
php7.4 /usr/local/bin/composer
alias composer7='php7.4 /usr/local/bin/composer'
alias composer8='php8.0 /usr/local/bin/composer'

使用symfony composer以及.php_version文件指定PHP版本

查看本地所有PHP版本

symfony local:php:list

显示结果

┌─────────┬────────────┬────────────┬─────────┬─────────┬─────────┬─────────┐
│ Version │ Directory  │  PHP CLI   │ PHP FPM │ PHP CGI │ Server  │ System? │
├─────────┼────────────┼────────────┼─────────┼─────────┼─────────┼─────────┤
│ 7.4.14  │ /usr/local │ bin/php    │         │         │ PHP CLI │ *       │
│ 7.4.16  │ /usr       │ bin/php7.4 │         │         │ PHP CLI │         │
└─────────┴────────────┴────────────┴─────────┴─────────┴─────────┴─────────┘

指定symfony composer使用PHP7

echo 7 > .php-version

指定symfony composer使用PHP8

echo 8 > .php-version

使用symfony composer安装或者更新包

symfony composer install

参考

Livewire 快速上手教程

Livewire – 不用一行JS实现vue/ng/react等框架的数据绑定效果

理解Livewire

构建现代的Web应用程序很困难。 Vue和React之类的工具功能非常强大,但是它们增加了全栈开发人员工作流程的复杂性。

Livewire是Laravel的全栈框架,可简化构建交互式页面的过程。不用一行JS实现vue/ng/react等框架的数据绑定效果。

理解它的最好方法就是看代码。

下面构建一个搜索组件,当用户键入搜索输入时,用户列表将实时更新。

组件PHP代码:

use Livewire\Component;

class SearchUsers extends Component
{
    public $search = '';

    public function render()
    {
        return view('livewire.search-users', [
            'users' => User::where('username', $this->search)->get(),
        ]);
    }
}

组件视图

<div>
    <input wire:model="search" type="text" placeholder="Search users..."/>

    <ul>
        @foreach($users as $user)
            <li>{{ $user->username }}</li>
        @endforeach
    </ul>
</div>

引用组件

<body>
    ...
    @livewire('search-users')
    ...
</body>

快速上手教程

教程非常简单,客户端点击一次按钮,实现客户端和服务端计数器同时加一。

安装 Livewire

composer require livewire/livewire

在视图中保护livewire的css和js

    @livewireStyles
</head>
<body>
    ...

    @livewireScripts
</body>
</html>

新增组件

php artisan make:livewire counter

组件文件内容

class Counter extends Component
{
    public $count = 0;

    public function increment()
    {
        $this->count++;
    }

    public function render()
    {
        return view('livewire.counter');
    }
}

组件视图

<div style="text-align: center">
    <button wire:click="increment">+</button>
    <h1>{{ $count }}</h1>
</div>

在视图中引用组件

<head>
    ...
    @livewireStyles
</head>
<body>
    <livewire:counter />

    ...

    @livewireScripts
</body>
</html>

相关资源

php redis连接数过多解决办法(Yii,predis,phpredis等)

Yii redis 持久配置

   'redis' => [
            'class' => 'yii\redis\Connection',
            'hostname' => '127.0.0.1',
            'retries' => 3,
            'port' => 6379,
            'password' => '',
            'socketClientFlags' => STREAM_CLIENT_CONNECT | STREAM_CLIENT_PERSISTENT,
        ],

predis redis 持久配置

  $client = new \Predis\Client([
            'scheme' => 'tcp',
            'host' => $redis->hostname,
            'port' => $redis->port,
            'password' => $redis->password,
            'persistent'=>true,
        ]);

phpredis redis 持久配置

$redis->pconnect('127.0.0.1', 6379);

nginx/python/mysql/fpm/go连接数解决办法

PHP实现姓名和手机号星号*替换

实现mb_substr_replace

   function mb_substr_replace($string, $replacement, $start, $length = null, $encoding = null)
    {
        if (extension_loaded('mbstring') === true) {
            $string_length = (is_null($encoding) === true) ? mb_strlen($string) : mb_strlen($string, $encoding);

            if ($start < 0) {
                $start = max(0, $string_length + $start);
            } else if ($start > $string_length) {
                $start = $string_length;
            }

            if ($length < 0) {
                $length = max(0, $string_length - $start + $length);
            } else if ((is_null($length) === true) || ($length > $string_length)) {
                $length = $string_length;
            }

            if (($start + $length) > $string_length) {
                $length = $string_length - $start;
            }

            if (is_null($encoding) === true) {
                return mb_substr($string, 0, $start) . $replacement . mb_substr($string, $start + $length, $string_length - $start - $length);
            }

            return mb_substr($string, 0, $start, $encoding) . $replacement . mb_substr($string, $start + $length, $string_length - $start - $length, $encoding);
        }

        return (is_null($length) === true) ? substr_replace($string, $replacement, $start) : substr_replace($string, $replacement, $start, $length);
    }

用户名星号替换

替换样例:

  • 马克思:马*思
  • 马思:*思
  • 马列主义:马*义
    public function getMaskName()
    {
        if (mb_strlen($this->name) > 2) {
            return mb_substr_replace($this->name, '*', 1, -1);
        } else {
            return mb_substr_replace($this->name, '*', 0, -1);
        }
    }

手机号星号替换

替换样例:

  • 12345679878:123***878
    public function getMaskMobile()
    {
        return substr_replace($this->mobile, '***', 3, -3);
    }

打印机自助打印代码(队列监控拦截+取消+状态获取)(附C#,C++,VB实现)

Monitor jobs in a printer queue (.NET)

https://www.codeproject.com/Articles/51085/Monitor-jobs-in-a-printer-queue-NET

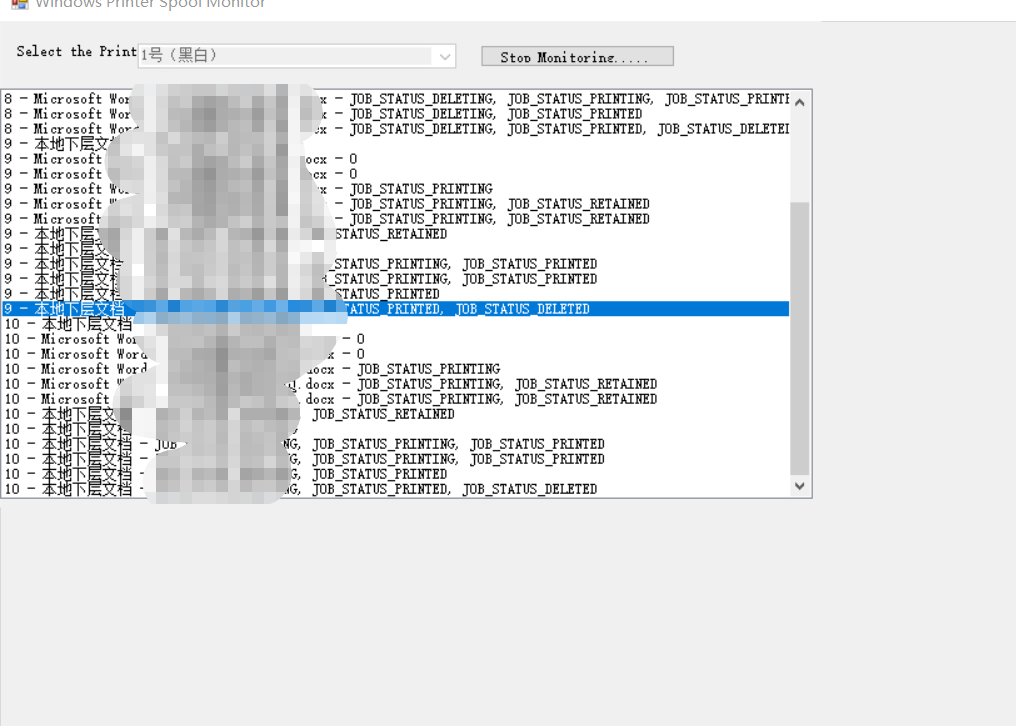
c# 完整代码展示了如何获取打印机任务状态

file

Print Spooler API

https://docs.microsoft.com/zh-cn/windows/win32/printdocs/print-spooler-api

The Print Spooler API provides an interface to the print spooler for applications to manage printers and print jobs.

The Print Spooler API is used by an application as part of its programming and not directly by end users.

PrintQueue.GetPrintJobInfoCollection Method

Creates a collection that contains a PrintSystemJobInfo object for each job in the queue.

https://docs.microsoft.com/en-us/dotnet/api/system.printing.printqueue.getprintjobinfocollection?view=netframework-4.8

"Virtual Printer" or "Moving Printjobs" (C++)

https://cboard.cprogramming.com/windows-programming/108156-virtual-printer-moving-printjobs.html

Monitoring a Printer Queue from VB.NET

https://www.codeproject.com/Articles/3313/Monitoring-a-Printer-Queue-from-VB-NET

How to catch printer event in python

https://stackoverflow.com/questions/15748386/how-to-catch-printer-event-in-python

Printers and SafeHandles

https://www.codeproject.com/Articles/14690/Printers-and-SafeHandles

Printers and SafeHandles (Part 2)

https://www.codeproject.com/Articles/15084/Printers-and-SafeHandles-Part-2