月度归档:2020年10月

Django工作流(状态管理)

本文通过简单的例子比较了django状态管理扩展的使用,涵盖django-fsm,xworkflows,django_transitions以及参考

django-fsm 使用例子

https://github.com/viewflow/django-fsm

state = FSMField(
    default=State.DRAFT,
    verbose_name='Publication State',
    choices=State.CHOICES,
    protected=True,
)
@transition(field=state, source=[State.APPROVED, State.EXPIRED],
    target=State.PUBLISHED,
    conditions=[can_display])
def publish(self):
    '''
    Publish the object.
    '''
    email_the_team()
    update_sitemap()
    busta_cache()

django-fsm-admin

https://github.com/gadventures/django-fsm-admin

from fsm_admin.mixins import FSMTransitionMixin

class YourModelAdmin(FSMTransitionMixin, admin.ModelAdmin):
    # The name of one or more FSMFields on the model to transition
    fsm_field = ['state',]
    readonly_fields = ['state', ]

admin.site.register(YourModel, YourModelAdmin)

xworkflows

https://github.com/rbarrois/xworkflows

import xworkflows

class MyWorkflow(xworkflows.Workflow):
    # A list of state names
    states = (
        ('foo', "Foo"),
        ('bar', "Bar"),
        ('baz', "Baz"),
    )
    # A list of transition definitions; items are (name, source states, target).
    transitions = (
        ('foobar', 'foo', 'bar'),
        ('gobaz', ('foo', 'bar'), 'baz'),
        ('bazbar', 'baz', 'bar'),
    )
    initial_state = 'foo'

class MyObject(xworkflows.WorkflowEnabled):
    state = MyWorkflow()

    @xworkflows.transition()
    def foobar(self):
        return 42

    # It is possible to use another method for a given transition.
    @xworkflows.transition('gobaz')
    def blah(self):
        return 13

django_transitions

LiveStatus Status

class LiveStatus(StatusBase):
    """Workflow for Lifecycle."""

    # Define the states as constants
    DEVELOP = 'develop'
    LIVE = 'live'
    MAINTENANCE = 'maintenance'
    DELETED = 'deleted'

    # Give the states a human readable label
    STATE_CHOICES = (
        (DEVELOP, 'Under Development'),
        (LIVE, 'Live'),
        (MAINTENANCE, 'Under Maintenance'),
        (DELETED, 'Deleted'),
    )

    # Define the transitions as constants
    PUBLISH = 'publish'
    MAKE_PRIVATE = 'make_private'
    MARK_DELETED = 'mark_deleted'
    REVERT_DELETED = 'revert_delete'

    # Give the transitions a human readable label and css class
    # which will be used in the django admin
    TRANSITION_LABELS = {
        PUBLISH : {'label': 'Make live', 'cssclass': 'default'},
        MAKE_PRIVATE: {'label': 'Under maintenance'},
        MARK_DELETED: {'label': 'Mark as deleted', 'cssclass': 'deletelink'},
        REVERT_DELETED: {'label': 'Revert Delete', 'cssclass': 'default'},
    }

    # Construct the values to pass to the state machine constructor

    # The states of the machine
    SM_STATES = [
        DEVELOP, LIVE, MAINTENANCE, DELETED,
    ]

    # The machines initial state
    SM_INITIAL_STATE = DEVELOP

    # The transititions as a list of dictionaries
    SM_TRANSITIONS = [
        # trigger, source, destination
        {
            'trigger': PUBLISH,
            'source': [DEVELOP, MAINTENANCE],
            'dest': LIVE,
        },
        {
            'trigger': MAKE_PRIVATE,
            'source': LIVE,
            'dest': MAINTENANCE,
        },
        {
            'trigger': MARK_DELETED,
            'source': [
                DEVELOP, LIVE, MAINTENANCE,
            ],
            'dest': DELETED,
        },
        {
            'trigger': REVERT_DELETED,
            'source':  DELETED,
            'dest': MAINTENANCE,
        },
    ]

Model:

class Lifecycle(LifecycleStateMachineMixin, models.Model):
    """
    A model that provides workflow state and workflow date fields.

    This is a minimal example implementation.
    """

    class Meta:  # noqa: D106
        abstract = False

    wf_state = models.CharField(
        verbose_name = 'Workflow Status',
        null=False,
        blank=False,
        default=LiveStatus.SM_INITIAL_STATE,
        choices=LiveStatus.STATE_CHOICES,
        max_length=32,
        help_text='Workflow state',
    )

    wf_date =  models.DateTimeField(
        verbose_name = 'Workflow Date',
        null=False,
        blank=False,
        default=timezone.now,
        help_text='Indicates when this workflowstate was entered.',
    )

Admin

# -*- coding: utf-8 -*-
"""Example django admin."""

from django_transitions.admin import WorkflowAdminMixin
from django.contrib import admin

from .models import Lifecycle

class LifecycleAdmin(WorkflowAdminMixin, admin.ModelAdmin):
    """
    Minimal Admin for Lifecycles Example.

    You probably want to make the workflow fields
    read only so yo can not change these values
    manually.

    readonly_fields = ['wf_state', 'wf_date']
    """

    list_display = ['wf_date', 'wf_state']
    list_filter = ['wf_state']

admin.site.register(Lifecycle, LifecycleAdmin)
参考

使用MSYS2+mingw+QT作为C++开发环境

下载msys2

在清华大学大学镜像站点https://mirrors.tuna.tsinghua.edu.cn/msys2/distrib/下载最新版32(i686)/64(x86_64)位系统msys2

下载后安装

pacman 的配置

msys2采用pacman管理软件包,修改pacman的软件源提高下载速度

编辑 /etc/pacman.d/mirrorlist.mingw32 ,在文件开头添加:

Server = https://mirrors.tuna.tsinghua.edu.cn/msys2/mingw/i686

编辑 /etc/pacman.d/mirrorlist.mingw64 ,在文件开头添加:

Server = https://mirrors.tuna.tsinghua.edu.cn/msys2/mingw/x86_64

编辑 /etc/pacman.d/mirrorlist.ucrt64 ,在文件开头添加:

Server = https://mirrors.tuna.tsinghua.edu.cn/msys2/mingw/ucrt64

编辑 /etc/pacman.d/mirrorlist.clang64 ,在文件开头添加:

Server = https://mirrors.tuna.tsinghua.edu.cn/msys2/mingw/clang64

编辑 /etc/pacman.d/mirrorlist.msys ,在文件开头添加:

Server = https://mirrors.tuna.tsinghua.edu.cn/msys2/msys/$arch

然后执行 pacman -Sy 刷新软件包数据即可。

pacman -Sy

安装开发环境

安装基本开发环境和常用工具

pacman -S  base-devel  git  wget  p7zip  perl ruby python

安装 32位 MinGW-w64

pacman -S  mingw-w64-i686-toolchain

安装 64位 MinGW-w64

pacman -S  mingw-w64-x86_64-toolchain

安装Qt5和Qt Creator

pacman -S mingw64/mingw-w64-x86_64-qt5 mingw64/mingw-w64-x86_64-qt-creator

参考

GlitchTip – 开源的Sentry API兼容的错误跟踪系统

GlitchTip is an open source, Sentry API compatible error tracking platform. It is a partial fork/partial reimplementation of Sentry’s open source codebase before it went proprietary. Its goals are to be a modern, easy-to-develop error tracking platform that respects your freedom to use it any way you wish. Some differences include:

A modern development environment with Python 3 and Django 3.1.
Simplicity over features. We use Postgres to store error data. Our code base is a fraction of the size of Sentry and looks like a typical Django app. We leverage existing open source Django ecosystem apps whenever possible.
Respects your privacy. No massive JS bundles. No invasive tracking. No third party spying. Even our marketing site runs Matomo and respects Do Not Track. GlitchTip will never report home. We will never know if you run it yourself.
Commitment to open source. We use open source tools like GitLab whenever possible. With our MIT license, you can use it for anything you’d like and even sell it. We believe in competition and hope you make GlitchTip even better.

Project status: Stable. Open an issue and say hello if you’d like to help. We are able to process basic error requests from the open source Sentry client tools. More features are on the way.

参考

PHP AMQP 使用指南

为什么要使用消息队列?

提速

使用了消息队列,生产者一方,把消息往队列里一扔,就可以立马返回,响应用户了。无需等待处理结果。

处理结果可以让用户稍后自己来取,如医院取化验单。也可以让生产者订阅(如:留下手机号码或让生产者实现listener接口、加入监听队列),有结果了通知。获得约定将结果放在某处,无需通知。

解耦

考虑电商系统下订单,发送数据给生产系统的情况。电商系统和生产系统之间的网络有可能掉线,生产系统可能会因维护等原因暂停服务。如果不使用消息队列,电商系统数据发布出去,顾客无法下单,影响业务开展。两个系统间不应该如此紧密耦合。应该通过消息队列解耦。同时让系统更健壮、稳定。

消除峰值

消息存在队列中,等待高峰期过后再处理

广播

多个客户端可以订阅同一个TOPIC,或者多个worker轮询并发执行任务

CentOS 安装 RabbitMQ

安装并启动rabbitmq

yum install rabbitmq-server
systemctl start rabbitmq-server
systemctl status rabbitmq-server
systemctl enable rabbitmq-server
rabbitmq-plugins enable rabbitmq_management

启动管理后台插件

rabbitmq-plugins enable rabbitmq_management

添加管理账户

rabbitmqctl add_user admin password
rabbitmqctl set_user_tags admin administrator
rabbitmqctl set_permissions -p / admin ".*" ".*" ".*"

开启端口

amqp端口是 5672 , 管理后台是 15672

RabbitMQ management API

https://rawcdn.githack.com/rabbitmq/rabbitmq-management/v3.8.9/priv/www/api/index.html

可以通过API管理RabbitMQ服务器

PHP的amqp扩展

php-amqplib 纯PHP库

https://github.com/php-amqplib/php-amqplib

composer 安装

composer require php-amqplib/php-amqplib

perl c扩展

https://pecl.php.net/package/amqp

linux 编译安装

pecl install amqp

centos yum remi库安装

 yum install php74-php-pecl-amqp

windows dll 安装

https://pecl.php.net/package/amqp

下载后php_amqp.dll放到ext目录,rabbitmq.4.dll放在php目录,修改php.ini添加extension=php_amqp.dll

使用AMQP

https://www.rabbitmq.com/tutorials/tutorial-one-php.html

参考

Django扩展推荐

Saleor

A modular, high performance, headless e-commerce storefront built with Python, GraphQL, Django, and ReactJS.

pretix 活动票务系统

cookiecutter-django 快速启动可投入生产的Django项目

PostHog开源分析工具

weblate 基于WEB且带版本控制的本地化工具

netbox DigitalOcean开源的数据中心基础设施管理工具

Django-environ 使用十二因子方法环境变量配置Django

然后创建一个.env文件:

DATABASE_URL=psql://user:un-githubbedpassword@127.0.0.1:8458/database

使用:

DATABASES = {
    'default': env.db('DATABASE_URL', default='sqlite:////tmp/my-tmp-sqlite.db')
}

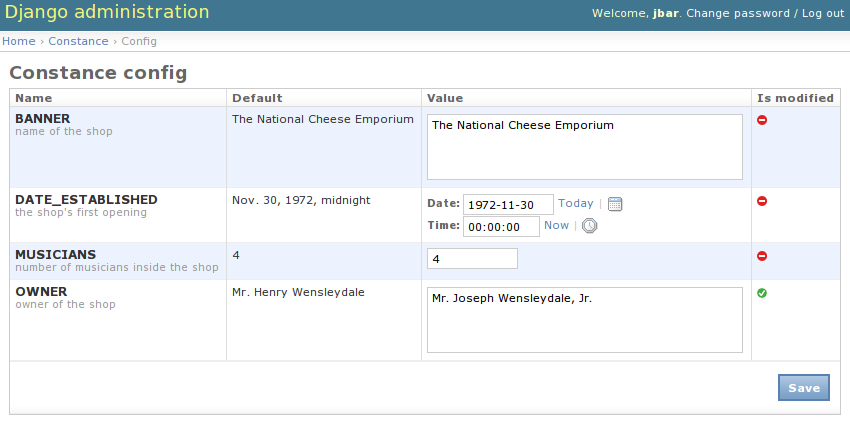
django-constance 动态Django设置

特征:

  • 轻松将静态设置迁移到动态设置。
  • 在Django管理界面中编辑动态设置。

file

django-moderation 审核任何模型对象

django-moderation是Django框架的可重用应用程序,它允许审核任何模型对象。

可能的用例:

  • 用户创建了自己的个人资料,该个人资料在网站上不可见。主持人批准后,它将在现场显示。
  • 用户更改了个人资料,可以在网站上看到旧的个人资料数据。主持人批准后,新数据将在现场显示。

特征:

  • 可配置的管理员集成(主持人批准后,可以在现场看到在管理员中更改的数据)
  • 管理员中的审核队列
  • html对象版本之间的变化差异
  • 可配置的电子邮件通知
  • 自定义模型形式,允许编辑对象的更改数据
  • 自动批准/拒绝选定的用户组或用户类型
  • 支持中等对象页面上的ImageField模型字段
  • 100%PEP8正确代码
  • 测试覆盖率> 80%

django-guardian – django 实现对象级别的权限控制

django-fsm – django状态机支持

cookiecutter-django-vue

Cookiecutter Django Vue is a template for Django-Vue projects.

django-bootstrap4

Bootstrap 4 integration with Django.