标签归档:fedora

fedora如何从Nautilus/Files打开终端

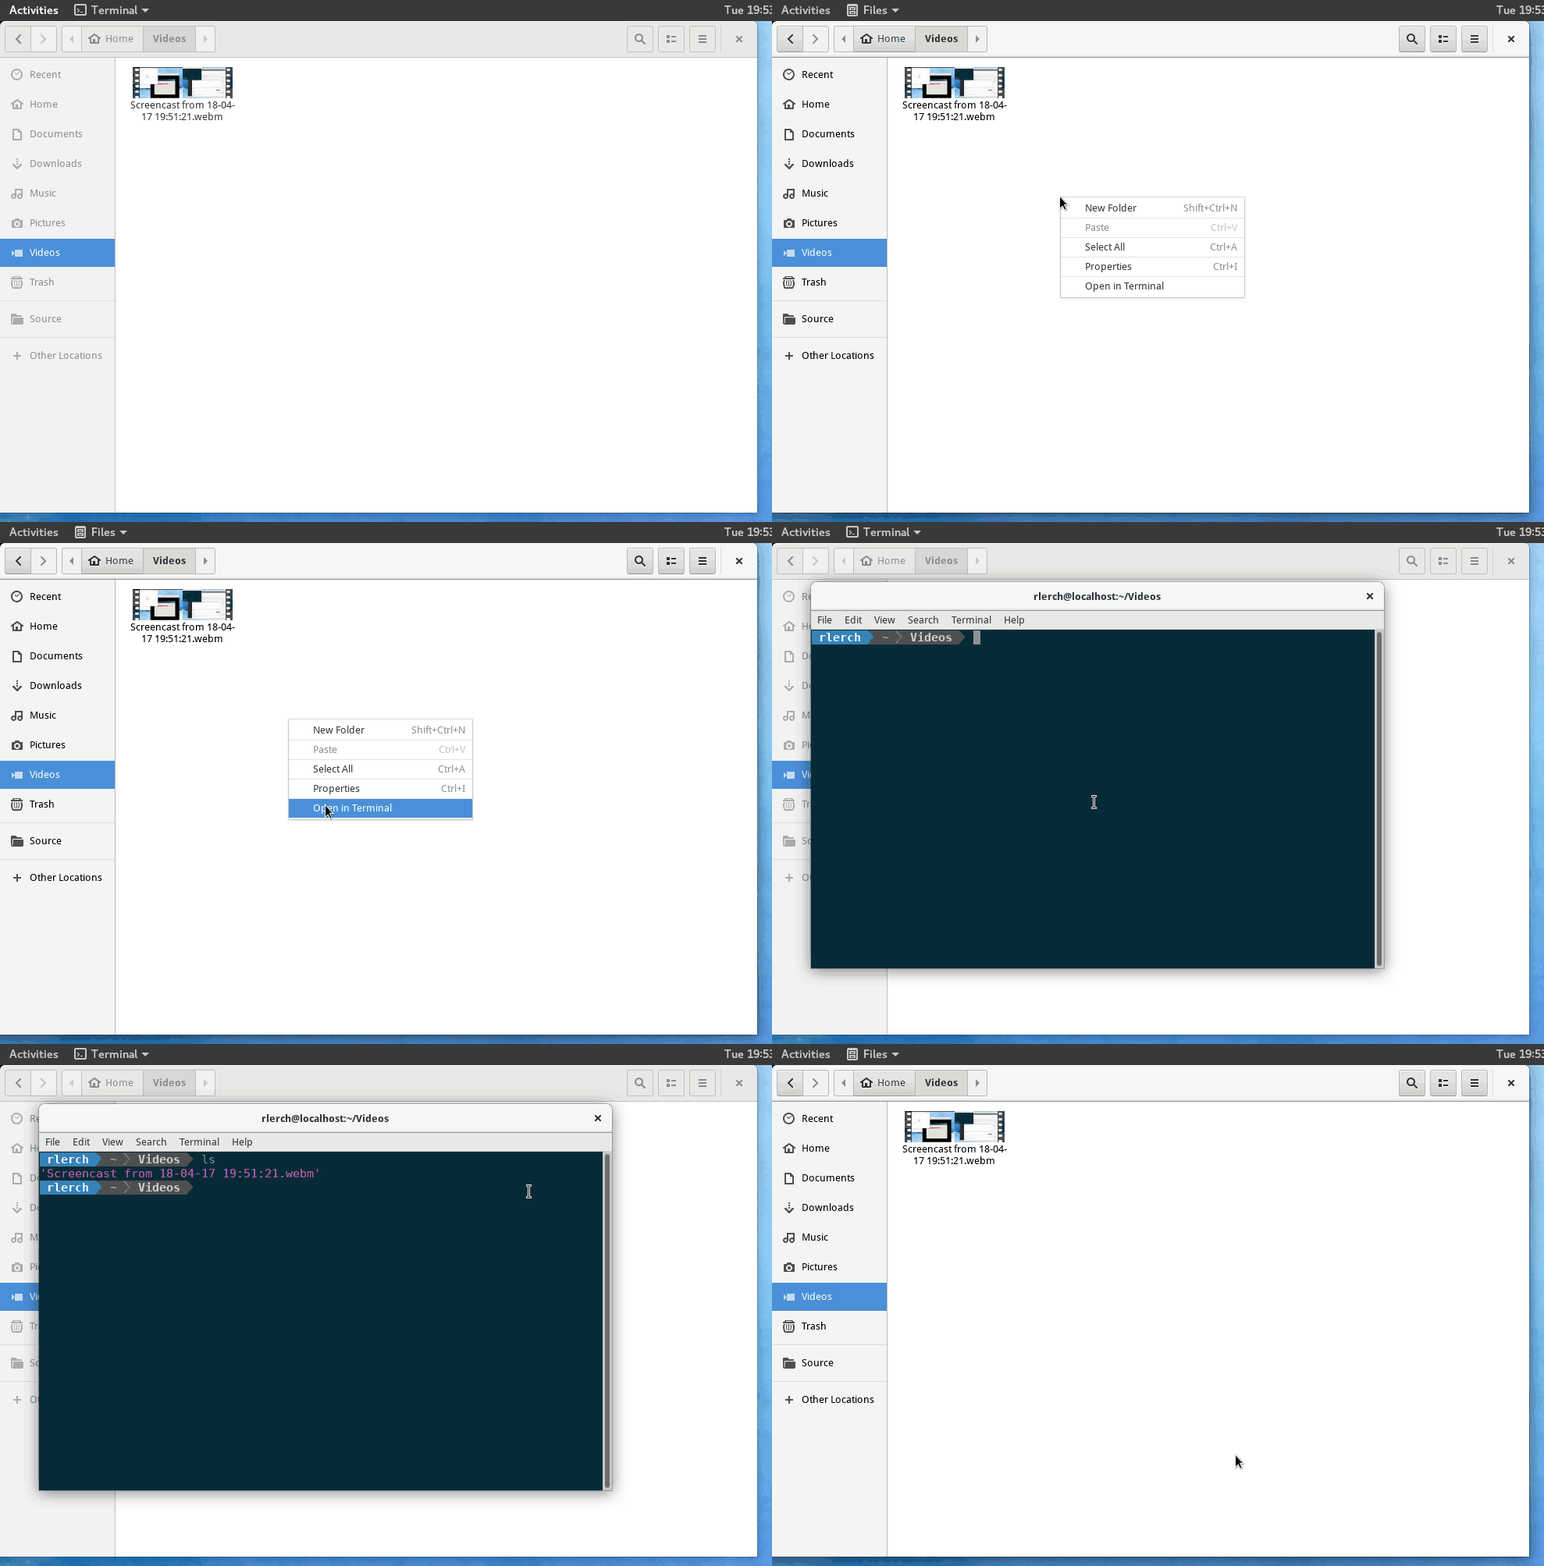
使用Files(又名Nautilus)时,您是否想过快速打开终端以在当前位置运行命令?

Nautilus的gnome-terminal-nautilus附加组件提供了一个右键单击上下文菜单项, 可以在当前位置快速打开一个新的gnome-terminal窗口。

enter image description here

当您需要对图形文件浏览器中正在查看的某些文件运行快速命令时,对nautilus界面的这一小调整非常方便。

安装gnome-terminal-nautilus

sudo dnf install gnome-terminal-nautilus

安装后,“在终端中打开”选项应出现在“文件”中的右键单击上下文菜单中。如果安装后没有出现,请通过运行以下命令强制关闭Nautilus。然后重新打开文件

nautilus -q

fedora27(centos)下用过dnf(yum)安装postgresql10

安装postgresql10-server

所有repo包都在 https://yum.postgresql.org/下,这里通过一级一级,先是postgresql10版本,然后选择fedora 10,然后下载安装

dnf install https://download.postgresql.org/pub/repos/yum/10/fedora/fedora-27-x86_64/pgdg-fedora10-10-3.noarch.rpm dnf install postgresql10-server

安装 pgadmin4

dnf install pgadmin4-v2

初始化数据库

sudo /usr/pgsql-10/bin/postgresql-10-setup initdb

运行数据库

系统服务被安装在/usr/lib/systemd/system/postgresql-10.service

systemctl start postgresql-10
systemctl enable postgresql-10

修改本地登录无需密码

sudo vim /var/lib/pgsql/10/data/pg_hba.conf

#host    all             all             127.0.0.1/32            ident
host    all             all             127.0.0.1/32            trust

fedora27+python3+virtualenv+virtualenvwrapper安装及使用

安装virtualenvwrapper

这里使用pip3进行安装即可

sudo pip3 install virtualenvwrapper

设置virtualenvwrapper的运行环境变量

编辑~/.bashrc,加入以下几行

VIRTUALENVWRAPPER_PYTHON=/usr/bin/python3 
export WORKON_HOME='~/.virtualenvs'
source /usr/local/bin/virtualenvwrapper.sh

使环境变量马上生效:

source ~/.bashrc

virtualenvwrapper使用

mkvirtualenv 新建虚拟环境

mkvirtualenv env1

建立后可以看到终端会以env1开头

(env1) [ning@localhost]$

再建立一个env2

mkvirtualenv env2

workon 启动/切换虚拟环境

workon env1

deactivate 离开虚拟环境

deactivate

rmvirtualenv 删除虚拟环境

rmvirtualenv env2

virtualenvwrapper help 查看virtualenvwrapper使用帮助

virtualenvwrapper is a set of extensions to Ian Bicking's virtualenv
tool.  The extensions include wrappers for creating and deleting
virtual environments and otherwise managing your development workflow,
making it easier to work on more than one project at a time without
introducing conflicts in their dependencies.

For more information please refer to the documentation:

    http://virtualenvwrapper.readthedocs.org/en/latest/command_ref.html

Commands available:

  add2virtualenv: add directory to the import path

  allvirtualenv: run a command in all virtualenvs

  cdproject: change directory to the active project

  cdsitepackages: change to the site-packages directory

  cdvirtualenv: change to the $VIRTUAL_ENV directory

  cpvirtualenv: duplicate the named virtualenv to make a new one

  lssitepackages: list contents of the site-packages directory

  lsvirtualenv: list virtualenvs

  mkproject: create a new project directory and its associated virtualenv

  mktmpenv: create a temporary virtualenv

  mkvirtualenv: Create a new virtualenv in $WORKON_HOME

  rmvirtualenv: Remove a virtualenv

  setvirtualenvproject: associate a project directory with a virtualenv

  showvirtualenv: show details of a single virtualenv

  toggleglobalsitepackages: turn access to global site-packages on/off

  virtualenvwrapper: show this help message

  wipeenv: remove all packages installed in the current virtualenv

  workon: list or change working virtualenvs

virtualenv –help 帮助

Usage: virtualenv [OPTIONS] DEST_DIR

Options:
  --version             show program's version number and exit
  -h, --help            show this help message and exit
  -v, --verbose         Increase verbosity.
  -q, --quiet           Decrease verbosity.
  -p PYTHON_EXE, --python=PYTHON_EXE
                        The Python interpreter to use, e.g.,
                        --python=python2.5 will use the python2.5 interpreter
                        to create the new environment.  The default is the
                        interpreter that virtualenv was installed with
                        (/usr/bin/python3)
  --clear               Clear out the non-root install and start from scratch.
  --no-site-packages    DEPRECATED. Retained only for backward compatibility.
                        Not having access to global site-packages is now the
                        default behavior.
  --system-site-packages
                        Give the virtual environment access to the global
                        site-packages.
  --always-copy         Always copy files rather than symlinking.
  --unzip-setuptools    Unzip Setuptools when installing it.
  --relocatable         Make an EXISTING virtualenv environment relocatable.
                        This fixes up scripts and makes all .pth files
                        relative.
  --no-setuptools       Do not install setuptools in the new virtualenv.
  --no-pip              Do not install pip in the new virtualenv.
  --no-wheel            Do not install wheel in the new virtualenv.
  --extra-search-dir=DIR
                        Directory to look for setuptools/pip distributions in.
                        This option can be used multiple times.
  --download            Download preinstalled packages from PyPI.
  --no-download, --never-download
                        Do not download preinstalled packages from PyPI.
  --prompt=PROMPT       Provides an alternative prompt prefix for this
                        environment.
  --setuptools          DEPRECATED. Retained only for backward compatibility.
                        This option has no effect.
  --distribute          DEPRECATED. Retained only for backward compatibility.
                        This option has no effect.

fedora 26快速安装PHP开发环境

Nvidia显卡驱动

sudo dnf config-manager --add-repo=http://negativo17.org/repos/fedora-nvidia.repo  
sudo dnf install kernel-devel dkms-nvidia -y

Vim & git & hg & svn

sudo dnf install vim git hg subversion -y

sudo不需要密码

sudo visudo

%wheel  ALL=(ALL)       NOPASSWD: ALL

禁止selinux

sudo setenforce 0 

sudo vi /etc/selinux/config

SELINUX=disabled

右键打开控制台窗口

sudo dnf install nautilus-open-terminal -y

Development tools

sudo dnf groupinstall "Development tools" -y

nginx & php & mysql

sudo dnf install  nginx php-cli php-devel php-mbstring php-opcache php-mysqlnd php-intl php-mcrypt php-pdo php-xml php-pecl-memcache  php-pecl-redis php-pecl-sphinx php-pecl-zip php-pgsql php-xdebug php-gd  php-pecl-redis  php-pecl-imagick  php-fpm -y
sudo dnf install mariadb mariadb-server -y
sudo systemctl enable php-fpm nginx mariadb

修改nginx配置

sudo service nginx stop 
sudo vim /etc/nginx/nginx.conf

nginx.conf配置修改如下:

user ning;
error_log /data/log/nginx/error.log;
pid /data/run/nginx.pid;

access_log  /data/log/nginx/access.log  main;

include /data/phpcode/projectname/vagrant/nginx/app.conf;

测试nginx配置

sudo nginx -t

修改nginx service配置:

sudo vim /usr/lib/systemd/system/nginx.service

nginx.service修改内容如下:

[Service]
PIDFile=/data/run/nginx.pid
ExecStartPre=/usr/bin/rm -f /data/run/nginx.pid

重新加载service

sudo systemctl daemon-reload
sudo systemctl start nginx

修改PHP配置

sudo service php-fpm stop
sudo vim /etc/php-fpm.d/www.conf

配置内容

user = ning
group = ning
listen = 127.0.0.1:9000
listen.acl_users = ning
php_value[session.save_path]    = /log/php/session
php_value[soap.wsdl_cache_dir]  = /log/php/wsdlcache
;php_value[opcache.file_cache]  = /log/php/opcache

重启

sudo service php-fpm stop

配置composer

下载安装文件

php -r "copy('https://install.phpcomposer.com/installer', 'composer-setup.php');"

安装

php composer-setup.php

删除安装文件

php -r "unlink('composer-setup.php');"

设置全局路径(windows请按参考文档设置)

sudo mv composer.phar ~/bin/composer

配置使用国内镜像

composer config -g repo.packagist composer https://packagist.phpcomposer.com

How to convert lantern debian/ubuntu deb package to CentOS/fedora rpm/yum package

Install deb to rpm tool

sudo dnf install alien

Download ubuntu deb file

Download url :https://github.com/getlantern/lantern/releases/tag/latest

Convert deb to rpm

sudo alien -r lantern-installer-64-bit.deb

Install rpm

sudo dnf install lantern-4.0.1-2.x86_64.rpm

Get Error:“conflicts with file from package filesystem”

Rebuild RPM

sudo dnf install rpmrebuild
sudo rpmrebuild -pe lantern-4.0.1-2.x86_64.rpm

Comment lines in rebuild file

(Converted from a deb package by alien version 8.95.)
%files
#%dir %attr(0755, root, root) "/"
#%dir %attr(0755, root, root) "/usr"
#%dir %attr(0755, root, root) "/usr/bin"
%attr(0777, root, root) "/usr/bin/lantern"
#%dir %attr(0755, root, root) "/usr/lib"
%dir %attr(0755, root, root) "/usr/lib/lantern"
%attr(0644, root, root) "/usr/lib/lantern/.packaged-lantern.yaml"
%attr(0644, root, root) "/usr/lib/lantern/lantern-binary"
%attr(0755, root, root) "/usr/lib/lantern/lantern.sh"
%attr(0644, root, root) "/usr/lib/lantern/lantern.yaml"
#%dir %attr(0755, root, root) "/usr/share"
#%dir %attr(0755, root, root) "/usr/share/applications"
%attr(0644, root, root) "/usr/share/applications/lantern.desktop"
#%dir %attr(0755, root, root) "/usr/share/doc"
%dir %attr(0755, root, root) "/usr/share/doc/lantern"
%doc %attr(0644, root, root) "/usr/share/doc/lantern/changelog.gz"
%doc %attr(0644, root, root) "/usr/share/doc/lantern/copyright"
#%dir %attr(0755, root, root) "/usr/share/icons"
#%dir %attr(0755, root, root) "/usr/share/icons/hicolor"
#%dir %attr(0755, root, root) "/usr/share/icons/hicolor/128x128"
#%dir %attr(0755, root, root) "/usr/share/icons/hicolor/128x128/apps"
%attr(0644, root, root) "/usr/share/icons/hicolor/128x128/apps/lantern.png"
%changelog

Install again

sudo rpm -i /root/rpmbuild/RPMS/x86_64/lantern-4.0.1-2.x86_64.rpm

Install libappindicator

sudo dnf install libappindicator-gtk3

Refs
fedora登录开启numlock

在登录Gnome 桌面时打开小键盘的Num Lock

sudo yum install numlockx
sudo cp /etc/gdm/Init/Default  /etc/gdm/Init/Default_backup
sudo gedit /etc/gdm/Init/Default

在文档末尾增加

if [ -x /usr/bin/numlockx ]; then
  /usr/bin/numlockx on
fi

保存退出,重启X server或下次登录Gnome就可以发现num lock灯亮了

Fedora 20安装Fcitx输入法并安装搜狗资源包

原文链接:http://yanue.net/post-140.html

1、先卸载系统自带的Ibus输入法

sudo yum remove ibus
gsettings set org.gnome.settings-daemon.plugins.keyboard active false

2、安装Fcitx输入法

yum install fcitx fcitx-devel fcitx-configtool fcitx-cloudpinyin fcitx-pinyin

3、配置一下Fcitx、在~/.bashrc中添加:如下内容

export GTK_IM_MODULE=fcitx  
export QT_IM_MODULE=fcitx  
export XMODIFIERS="@im=fcitx"

4、注销或重启后完成安装

上面步骤完成之后其实就可以使用Fcitx输入法

不过看到搜狗输入法都已经出deb包了

所以就想着安装个搜狗输入法到Fcitx上去。

5、安装搜狗资源包

从下面的连接地址下载对应的deb包、32位系统用i386.deb、64位系统用amd64.deb

http://mirrors.ustc.edu.cn/deepin/pool/non-free/f/fcitx-sogoupinyin-release/

随便在从如下地址下载一个搜狗输入法的皮肤

http://mirrors.ustc.edu.cn/deepin/pool/main/f/fcitx-skins/

6、下载完成之后双击打开amd64.deb、将里面的data.tar.bz提取出来、然后到解压压缩文件

接着我们把解压出来的.so文件移动到Fcitx的指定目录即可(64位为例)

cp /usr/lib/x86_64-linux-gnu/fcitx/fcitx-sogoupinyin.so /usr/lib64/fcitx/

最后加上执行权限

chmod +x /usr/lib64/fcitx/fcitx-sogoupinyin.so

fedora开放环境一键安装

sudo不需要密码

visudo

%wheel  ALL=(ALL)       NOPASSWD: ALL

开发环境

yum groupinstall "Development tools" -y

右键打开控制台窗口

yum install nautilus-open-terminal

禁止selinux

setenforce 0 

vi /etc/selinux/config

SELINUX=disabled

安装vscode

sudo rpm --import https://packages.microsoft.com/keys/microsoft.asc
sudo sh -c 'echo -e "[code]\nname=Visual Studio Code\nbaseurl=https://packages.microsoft.com/yumrepos/vscode\nenabled=1\ngpgcheck=1\ngpgkey=https://packages.microsoft.com/keys/microsoft.asc" > /etc/yum.repos.d/vscode.repo'

vim & git & hg & svn

yum install vim git hg subversion

nginx & php & mysql

yum install mariadb nginx php-cli php-devel php-mbstring php-opcache php-mysqlnd php-intl php-mcrypt php-pdo php-xml php-pecl-memcache  php-pecl-redis php-pecl-sphinx php-pecl-zip php-pgsql php-xdebug php-gd  php-pecl-redis  php-pecl-imagick  php-fpm

python

yum install python-virtualenv pyvenv ~/py cd ~/py/bin source activate wget https://bootstrap.pypa.io/get-pip.py python get-pip.py

golang

wget http://golang.org/dl/go1.3.linux-amd64.tar.gz
tar -C /usr/local -xzf go1.3.linux-amd64.tar.gz 
mkdir ~/gosrc
vim ~/.bash_profile

设置GOROOT与GOPATH

GOPATH=$HOME/gosrc
GOROOT=/usr/local/go
export GOROOT
export GOPATH
PATH=$PATH:$GOROOT/bin:$GOPATH/bin
export PATH

修改系统参数

vi /etc/sysctl.conf

fs.file-max = 500000

vi /etc/security/limits.conf

* soft nofile 60000
* hard nofile 60000

vi /etc/security/limits.d/90-nproc.conf

*          soft    nproc     4096
root       soft    nproc     unlimited