分类目录归档:Tools

使用 WSL 作为开发环境 (Ubuntu+PostgreSQL+MariaDB/Mysql+PHP+Python+NodeJS+镜像安装)

安装后配置

修改DNS

/etc/resolv.conf

nameserver 223.5.5.5

修改软件源

一般情况下,将 /etc/apt/sources.list 文件中 Ubuntu 默认的源地址 http://archive.ubuntu.com/ 替换为 http://mirrors.ustc.edu.cn 即可。

可以使用如下命令:

sudo sed -i ‘s/archive.ubuntu.com/mirrors.ustc.edu.cn/g’ /etc/apt/sources.list

更新包

sudo apt update
sudo apt upgrade

PostgreSQL

新增apt源配置

新增配置文件 /etc/apt/sources.list.d/pgdg.list,内容:

deb https://mirrors.ustc.edu.cn/postgresql/repos/apt/ focal-pgdg main

bionic可以换成去其他版本号

导入key并安装

wget --quiet -O - https://mirrors.ustc.edu.cn/postgresql/repos/apt/ACCC4CF8.asc | sudo apt-key add -
sudo apt-get update
sudo apt install postgresql-12
sudo systemctl enable postgresql
sudo service start postgresql

创建数据库以及账户

切换到postgres用户并运行psql

sudo -u postgres psql

创建数据以及用户账户

CREATE USER c4ys WITH PASSWORD 'c4ys';
CREATE DATABASE c4ys OWNER c4ys;

MariaDb

下载key

sudo apt-get install software-properties-common
sudo apt-key adv --fetch-keys 'https://mariadb.org/mariadb_release_signing_key.asc'
sudo add-apt-repository 'deb [arch=amd64,arm64,ppc64el] https://mirrors.ustc.edu.cn/mariadb/repo/10.5/ubuntu focal main'
sudo apt update
sudo apt install mariadb-server

将源配置修改到单独文件

系统会自动在source.list增加配置,可以将配置移动到单独文件

/etc/apt/sources.list.d/MariaDB.list

deb [arch=ppc64el,arm64,amd64] https://mirrors.ustc.edu.cn/mariadb/repo/10.5/ubuntu focal main
# deb-src [arch=ppc64el,arm64,amd64] https://mirrors.ustc.edu.cn/mariadb/repo/10.5/ubuntu focal main

自动启动

sudo systemctl enable mariadb
sudo service mariadb start
sudo mysql_secure_installation

Python

将python3作为默认Python

sudo apt install python-is-python3  python3-pip

PHP+NGINX

sudo apt install nginx nginx php-cli php-dev php-mbstring php-mbstring  php-intl php-xml php-redis php-gd php-fpm php-curl php-bcmath php-zip -y

NPM+NGINX

sudo apt install npm

参考

将chrome的copy as cURL转换成Python、PHP、Go等十多种语言代码

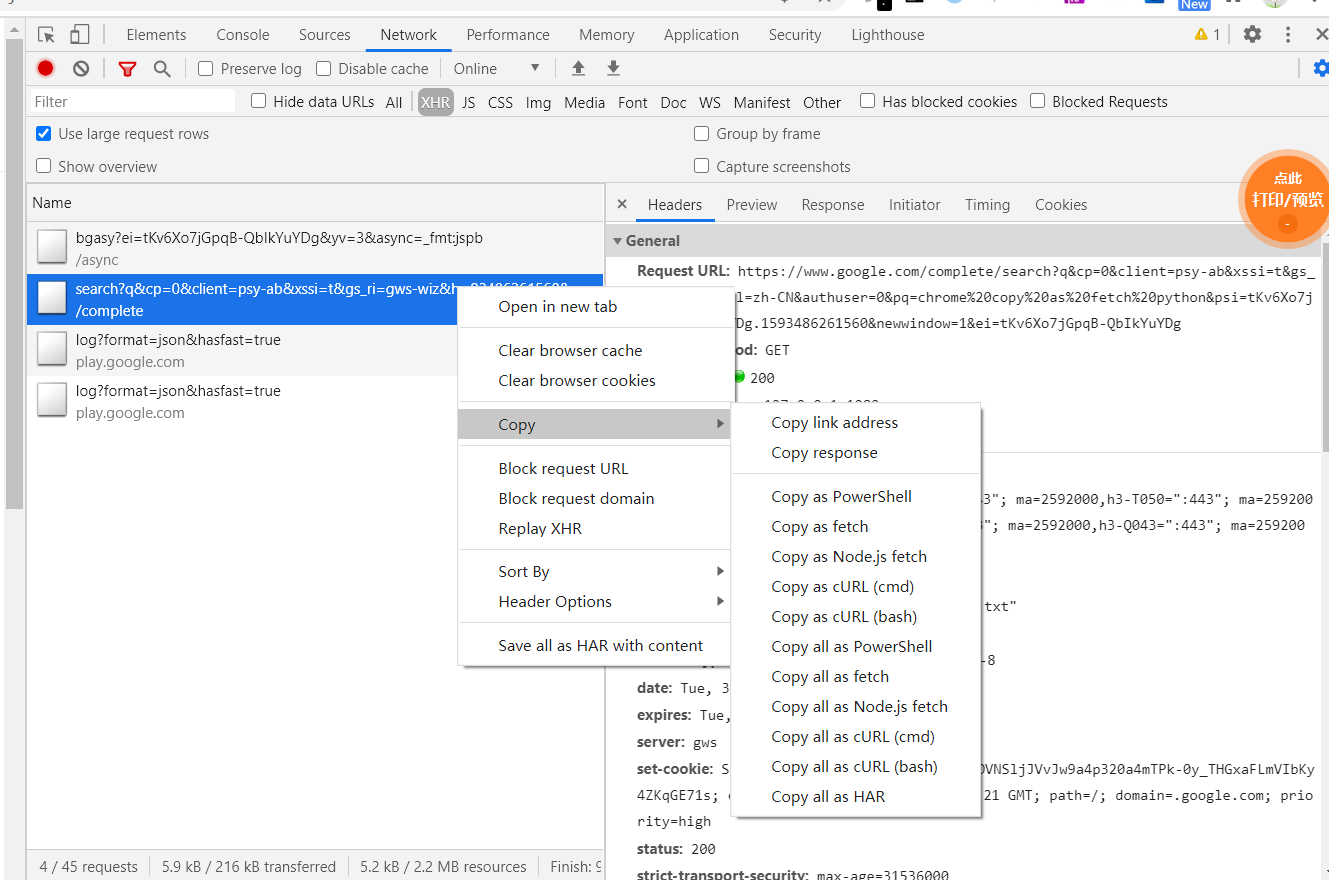
chrome提供了非常方便的复制功能,可以将页面请求复制为curl命令行或者nodejs fetch等。那么,能不能得到其他比如PHP,Go,Python版本的代码呢?答案是可以,且只需两步。

获取curl代码

在 Chrome 开发工具的网络选项卡中,右键单击请求,然后单击“复制” > “复制为 cURL (命令)”。

file

得到

curl 'https://c4ys.com/' -H 'authority: c4ys.com'...

将cURL命令转化成其他语言代码

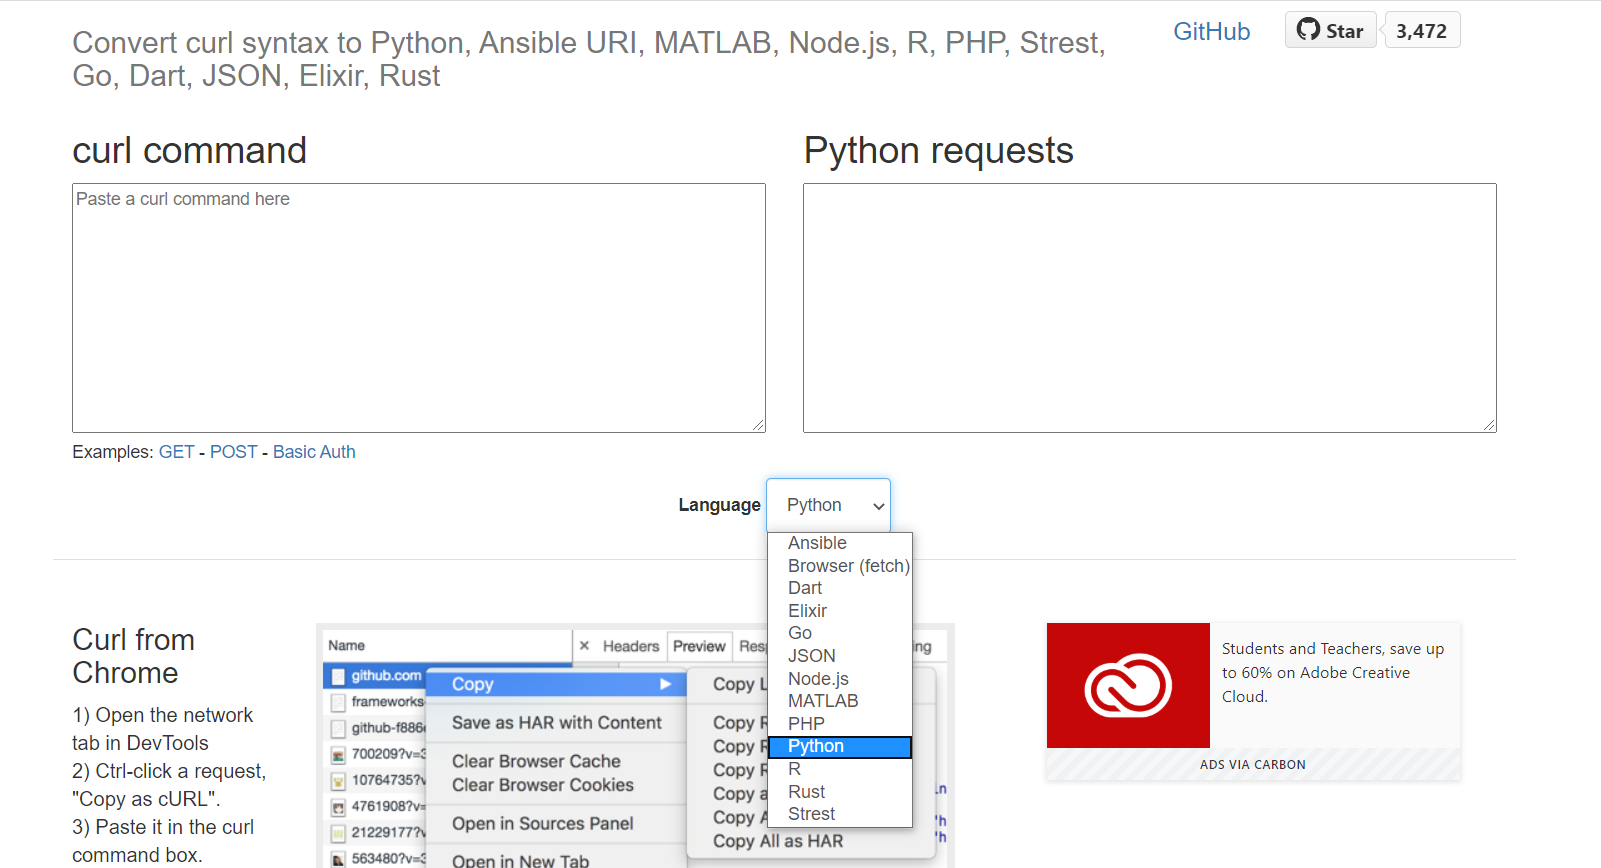
浏览器打开 https://cURL.trillworks.com/ 就可以将 cURL 命令转换成 Python、 NodeJS 、Go、 PHP等十多个语言版本了。

file

Windows Terminal支持ssh,git-bash,wsl, msys

打开 profiles.json 配置文件

打开Windows Terminal,点击设置,可以看到,复制增加一组ssh配置,然后修改三个地方。

{
// Make changes here to the powershell.exe profile.
"guid": "{61c54bbd-c2c6-5271-96e7-009a87ff44bf}",
"name": "Windows PowerShell",
"commandline": "powershell.exe",
"hidden": false
},

修改guid

利用powershell可以生成guid

powershell -Command "[guid]::NewGuid().ToString()"

修改名字

任意,可以是系统名字,IP,用户名等,如 username@aliyun-bj

修改commandline

ssh -i C:\user\username\id_rsa username@aliyun-bj

其中i参数后面为证书存放位置,如果试用密码登录可以不填

完整SSH支持(图标,配色等)

 {
     "acrylicOpacity" : 1,
     "closeOnExit" : true,
     "colorScheme" : "One Half Dark",
     "commandline" : "ssh username@aliyun-bj",
     "cursorColor" : "#FFFFFF",
     "cursorShape" : "bar",
     "fontFace" : "Consolas",
     "fontSize" : 14,
     "guid" : "{61c54bbd-c2c6-5271-96e7-009a87ff44bf}",
     "historySize" : 9001,
     "icon" : "ms-appx:///ProfileIcons/{9acb9455-ca41-5af7-950f-6bca1bc9722f}.png",
     "name" : "username@aliyun-bj",
     "padding" : "0, 0, 0, 0",
     "snapOnInput" : true,
     "startingDirectory" : "",
     "useAcrylic" : false
 }

 支持Git-bash

{
            "guid": "{7f0152b2-c491-4bb6-8a87-610352d630c8}",
            "acrylicOpacity" :1,
            "closeOnExit" : true,
            "colorScheme" : "Campbell",
            "commandline" : "\"%PROGRAMFILES%\\Git\\Bin\\bash.exe\" -i -l",
            "cursorColor" : "#FFFFFF",
            "cursorShape" : "bar",
            "fontFace" : "Consolas",
            "fontSize" : 14,
            "historySize" : 9001,
            "icon" : "%PROGRAMFILES%\\Git\\mingw64\\share\\git\\git-for-windows.ico",
            "name" : "Git-bash",
            "padding" : "0, 0, 0, 0",
            "snapOnInput" : true,
            "startingDirectory" : "%USERPROFILE%",
            "useAcrylic" : true
        }

WSL

        {
            "guid": "{2c4de342-38b7-51cf-b940-2309a097f518}",
            "hidden": false,
            "name": "Ubuntu",
            "source": "Windows.Terminal.Wsl"
        },

msys2

 {
                "guid": "{17da3cac-b318-431e-8a3e-7fcdefe6d114}",
                "name": "MINGW64 / MSYS2",
                "commandline": "C:/msys64/msys2_shell.cmd -defterm -here -no-start -mingw64",
                "startingDirectory": "C:/msys64/home/%USERNAME%",
                "icon": "C:/msys64/mingw64.ico",
                "fontFace": "Lucida Console",
                "fontSize": 9
            },
            {
                "guid": "{2d51fdc4-a03b-4efe-81bc-722b7f6f3820}",
                "name": "MINGW32 / MSYS2",
                "commandline": "C:/msys64/msys2_shell.cmd -defterm -here -no-start -mingw32",
                "startingDirectory": "C:/msys64/home/%USERNAME%",
                "icon": "C:/msys64/mingw32.ico",
                "fontFace": "Lucida Console",
                "fontSize": 9
            },
            {
                "guid": "{71160544-14d8-4194-af25-d05feeac7233}",
                "name": "MSYS / MSYS2",
                "commandline": "C:/msys64/msys2_shell.cmd -defterm -here -no-start -msys",
                "startingDirectory": "C:/msys64/home/%USERNAME%",
                "icon": "C:/msys64/msys2.ico",
                "fontFace": "Lucida Console",
                "fontSize": 9
            }

参考
付费、免费以及开源工单系统比较

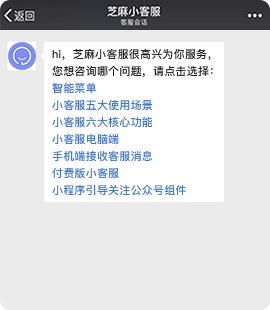
比较了网易七鱼,创逸云客服,udesk,单小二,腾讯云智服,售后宝,以及国内开源产品。

收费软件大多是集成在客服、CRM中,存在接口不足、界面太重、价格过高的问题。开源项目都基本是没法用。而国外的对微信,钉钉支付不好。

目前看来售后宝比较符合需求。API调用10万次1000元。

file

nginx 非www跳www,www跳非www,http跳https

非www跳www

if ($host ~ ^(?!www\.)(?<domain>.+)$) {
    return  301 $scheme://www.$domain$request_uri;
}

www to non-www

if ($host ~ ^www\.(?<domain>.+)$) {
    return  301 $scheme://$domain$request_uri;
}

其他域名跳统一域名

if ($host != "example.com") {
    return  301 $scheme://example.com$request_uri;
}

http跳https

if ($scheme != "https") {
       return 301 https://$host$request_uri;
   } # managed by Certbot

参考

letsencrypt https证书增加OCSP Stapling解决iOS公众号H5首次打开慢问题

原因

最近收到反馈网站公众号H5打卡慢,发现都是iOS用户,最后搜了以下发现可能因为letsencrypt证书域名被污染,导致到国外验证证书慢,解决办法是开启OCSP Stapling本地服务器缓存。

nginx 日志可以看到

ocsp.int-x3.letsencrypt.org could not be resolved (110: Operation timed out)

检查证书是否已开启OCSP Stapling

openssl s_client -connect c4ys.com:443 -servername c4ys.com -status -tlsextdebug < /dev/null 2>&1 | grep "OCSP"

(nginx重启后需要运行两次,第二次才有结果)

如果结果是下面这样,说明 OCSP Stapling 已开启:

OCSP response:
OCSP Response Data:
    OCSP Response Status: successful (0x0)
    Response Type: Basic OCSP Response

而这样显然是未开启:

OCSP response: no response sent

开启ssl_stapling的两个条件

根据 nginx ssl_stapling 官方文档只需要两个条件即可:

  • 指定了resolver
  • 如果ssl_certificate没有包含中间商证书,则需要将中间证书包含在ssl_trusted_certificate中

letsencrypt certbot的ssl_certificate使用的是fullchain.pem,带了中间证书,所以只需要指定resolver即可。生成ssl_trusted_certificate和ssl_stapling_file的步骤不是必须的。

ssl_stapling on;
ssl_stapling_verify on;
resolver 8.8.8.8 8.8.4.4 valid=60s ipv6=off;
resolver_timeout 5s;

查看当前域名的证书链

查看站点根证书,0,站点证书;1,中间证书,2,根证书

openssl s_client -connect c4ys.com:443 -servername c4ys.com -showcerts < /dev/null 2>&1

depth=2 O = Digital Signature Trust Co., CN = DST Root CA X3
verify return:1
depth=1 C = US, O = Let's Encrypt, CN = Let's Encrypt Authority X3
verify return:1
depth=0 CN = c4ys.com
verify return:1

下载根证书

letsencrypt 的证书链介绍和下载

其他证书下载

cd /etc/letsencrypt/live/c4ys.com/
wget https://letsencrypt.org/certs/trustid-x3-root.pem.txt
mv trustid-x3-root.pem.txt trustid-x3-root.pem

验证证书

openssl x509 -in cert.pem -noout -subject
openssl x509 -in chain.pem -noout -subject
openssl x509 -in trustid-x3-root.pem -noout -subject

生成ssl_trusted_certificate

cat cert.pem chain.pem  trustid-x3-root.pem > ca_bundled.pem

查看证书ocsp地址

查看证书签署,来自ocsp.int-x3.letsencrypt.org

openssl x509 -in cert.pem -noout -ocsp_uri

验证ocsp获取

openssl ocsp -no_nonce -text \
-issuer chain.pem \
-cert cert.pem \
-CAfile ca_bundled.pem \
-VAfile ca_bundled.pem \
-url http://ocsp.int-x3.letsencrypt.org/ \
-header "HOST" "ocsp.int-x3.letsencrypt.org"

发现超时,修改/etc/resolv.conf,服务器dns

nameserver 8.8.8.8

然后出现

Response verify OK
cert.pem: good

开启ssl_stapling

ssl_trusted_certificate /etc/letsencrypt/live/c4ys.com/ca_bundled.pem;

开启后可以通过前面的方法验证,第二次才有效

服务器缓存OSCP staplingresp(可选)

服务器可以将OSCP resp缓存起来,避免走国外下载

使用ssl_stapling_responder(方式一,推荐)

由于ssl_stapling_file需要手动更新,比较麻烦,所以通过http代理获取。
参考:https://jhuo.ca/post/ocsp-stapling-letsencrypt/

开启ssl_stapling_file(方式二,推荐)

ssl_stapling_file可以将oscp缓存起来,避免服务器下载

下载并保存 oscp resp

openssl ocsp -no_nonce -text \
-issuer chain.pem \
-cert cert.pem \
-CAfile ca_bundled.pem \
-VAfile ca_bundled.pem \
-url http://ocsp.int-x3.letsencrypt.org/ \
-header "HOST" "ocsp.int-x3.letsencrypt.org" \
-respout ocsp.resp

nginx启用ssl_stapling_file

ssl_stapling_file /etc/letsencrypt/live/c4ys.com/ocsp.resp;

自动更新ssl_stapling_file

oscp有效时间通常只有7天,所以需要使用脚本自动更新缓存,参考:https://quchao.com/entry/how-to-configure-ocsp-stapling-on-nginx-for-the-certificates-issued-by-lets-encrypt/

参考

让Windows支持通过ide://open和phpstorm://open打开phpstorm

C:\Program Files下新建PhpStorm Protocol (Win)文件夹,包含以下两个文件。
修改run_editor.reg后,点击运行即可。

run_editor.reg

REGEDIT4

[HKEY_CLASSES_ROOT\phpstorm]
@="URL:phpstorm Protocol"
"URL Protocol"=""

[HKEY_CLASSES_ROOT\phpstorm\shell\open\command]
@="wscript \"C:\\Program Files\\PhpStorm Protocol (Win)\\run_editor.js\" \"%1\" //E:JScript"

[HKEY_CLASSES_ROOT\ide]
@="URL:ide Protocol"
"URL Protocol"=""

[HKEY_CLASSES_ROOT\ide\shell\open\command]
@="wscript \"C:\\Program Files\\PhpStorm Protocol (Win)\\run_editor.js\" \"%1\" //E:JScript"

run_editor.js

var settings = {
    // flag to active Jetbrain Toolbox configuration
    toolBoxActive: false,

    // Set to 'true' (without quotes) if run on Windows 64bit. Set to 'false' (without quotes) otherwise.
    x64: true,

    // Set to folder name, where PhpStorm was installed to (e.g. 'PhpStorm')
    folder_name: 'PhpStorm 2018.3.1',

    // Set to window title (only text after dash sign), that you see, when switching to running PhpStorm instance
    window_title: 'PhpStorm',

    // In case your file is mapped via a network share and paths do not match.
    // eg. /var/www will can replaced with Y:/
    projects_basepath: '',
    projects_path_alias: ''
};

// don't change anything below this line, unless you know what you're doing
var url = WScript.Arguments(0),
    match = /^phpstorm|ide:\/\/open\/?\?(url=file:\/\/|file=)(.+)&line=(\d+)$/.exec(url),
    project = '',
    editor = '"C:\\' + ( settings.x64 ? 'Program Files' : 'Program Files (x86)' ) + '\\JetBrains\\' + settings.folder_name + ( settings.x64 ? '\\bin\\phpstorm64.exe' : '\\bin\\phpstorm.exe' ) + '"';

if (settings.toolBoxActive) {
    configureToolboxSettings(settings);
}

// WScript.Echo(editor);
// WScript.Echo(url);

if (match) {

    var shell = new ActiveXObject('WScript.Shell'),
        file_system = new ActiveXObject('Scripting.FileSystemObject'),
        file = decodeURIComponent(match[ 2 ]).replace(/\+/g, ' '),
        search_path = file.replace(/\//g, '\\');

    if (settings.projects_basepath !== '' && settings.projects_path_alias !== '') {
        file = file.replace(new RegExp('^' + settings.projects_basepath), settings.projects_path_alias);
    }

    while (search_path.lastIndexOf('\\') !== -1) {
        search_path = search_path.substring(0, search_path.lastIndexOf('\\'));

        if (file_system.FileExists(search_path + '\\.idea\\.name')) {
            project = search_path;
            break;
        }
    }

    if (project !== '') {
        editor += ' "%project%"';
    }

    editor += ' --line %line% "%file%"';

    var command = editor.replace(/%line%/g, match[ 3 ])
        .replace(/%file%/g, file)
        .replace(/%project%/g, project)
        .replace(/\//g, '\\');

    shell.Exec(command);
    shell.AppActivate(settings.window_title);
}

function configureToolboxSettings(settings) {
    var shell = new ActiveXObject('WScript.Shell'),
        appDataLocal = shell.ExpandEnvironmentStrings("%localappdata%"),
        toolboxDirectory = appDataLocal + '\\JetBrains\\Toolbox\\apps\\PhpStorm\\ch-0\\';

    // Reference the FileSystemObject
    var fso = new ActiveXObject('Scripting.FileSystemObject');

    // Reference the Text directory
    var folder = fso.GetFolder(toolboxDirectory);

    // Reference the File collection of the Text directory
    var fileCollection = folder.SubFolders;

    var maxMajor = 0,
        maxMinor = 0,
        maxPatch = 0,
        maxVersionFolder = "";
    // Traverse through the fileCollection using the FOR loop
    // read the maximum version from toolbox filesystem
    for (var objEnum = new Enumerator(fileCollection); !objEnum.atEnd(); objEnum.moveNext()) {
        var folderObject = ( objEnum.item() );
        if (folderObject.Name.lastIndexOf('plugins') === -1) {
            var versionMatch = /(\d+)\.(\d+)\.(\d+)/.exec(folderObject.Name),
                major = parseInt(versionMatch[ 1 ]),
                minor = parseInt(versionMatch[ 2 ]),
                patch = parseInt(versionMatch[ 3 ]);
            if (maxMajor === 0 || maxMajor <= major) {
                maxMajor = major;
                if (maxMinor === 0 || maxMinor <= minor) {
                    maxMinor = minor;
                    if (maxPatch === 0 || maxPatch <= patch) {
                        maxPatch = patch;
                        maxVersionFolder = folderObject.Name;
                    }
                }
            }
        }
    }

    settings.folder_name = maxVersionFolder;

    // read version name and product name from product-info.json
    var versionFile = fso.OpenTextFile(toolboxDirectory + settings.folder_name + "\\product-info.json", 1, true);
    var content = versionFile.ReadAll();

    eval('var productVersion = ' + content + ';');
    settings.window_title = 'PhpStorm ' + productVersion.version;
    editor = '"' + toolboxDirectory + settings.folder_name + '\\' + productVersion.launch[ 0 ].launcherPath.replace(/\//g, '\\') + '"';
}

参考

docker中国镜像

docker中国镜像地址

国内从 Docker Hub 拉取镜像有时会遇到困难,此时可以配置镜像加速器。国内很多云服务商都提供了国内加速器服务。

由于镜像服务可能出现宕机,建议同时配置多个镜像。各个镜像站测试结果请到 https://github.com/docker-practice/docker-registry-cn-mirror-test/actions 查看。

镜像加速器 镜像加速器地址 专属加速器 其它加速
Docker 中国官方镜像 https://registry.docker-cn.com Docker Hub
DaoCloud 镜像站 http://f1361db2.m.daocloud.io 可登录,系统分配 Docker Hub
Azure 中国镜像 https://dockerhub.azk8s.cn Docker Hub、GCR、Quay
科大镜像站 https://docker.mirrors.ustc.edu.cn Docker Hub、GCRQuay
阿里云 https://<your_code>.mirror.aliyuncs.com 需登录,系统分配 Docker Hub
七牛云 https://reg-mirror.qiniu.com Docker Hub、GCR、Quay
网易云 https://hub-mirror.c.163.com Docker Hub
腾讯云 https://mirror.ccs.tencentyun.com Docker Hub

Ubuntu 16.04+、Debian 8+、CentOS 7

对于使用 systemd 的系统,请在 /etc/docker/daemon.json 中写入如下内容(如果文件不存在请新建该文件)

{
  "registry-mirrors": [
    "https://hub-mirror.c.163.com"
  ]
}

注意,一定要保证该文件符合 json 规范,否则 Docker 将不能启动。

之后重新启动服务。

$ sudo systemctl daemon-reload
$ sudo systemctl restart docker

Windows 10

对于使用 Windows 10 的用户,在任务栏托盘 Docker 图标内右键菜单选择 Settings,打开配置窗口后在左侧导航菜单选择 Docker Engine,在右侧像下边一样编辑 json 文件,之后点击 Apply & Restart 保存后 Docker 就会重启并应用配置的镜像地址了。

{
  "registry-mirrors": [
    "https://hub-mirror.c.163.com"
  ]
}

macOS

对于使用 macOS 的用户,在任务栏点击 Docker Desktop 应用图标 -> Perferences,在左侧导航菜单选择 Docker Engine,在右侧像下边一样编辑 json 文件。修改完成之后,点击 Apply & Restart 按钮,Docker 就会重启并应用配置的镜像地址了。

{
  "registry-mirrors": [
    "https://hub-mirror.c.163.com"
  ]
}

检查加速器是否生效

执行 $ docker info,如果从结果中看到了如下内容,说明配置成功。

Registry Mirrors:
 https://hub-mirror.c.163.com/

镜像测速

使用镜像前后,可使用 time 统计所花费的总时间。测速前先移除本地的镜像!

$ docker rmi node:latest
$ time docker pull node:latest
Pulling repository node
[...]

real   1m14.078s
user   0m0.176s
sys    0m0.120s

alpine镜像

alpine是一个只有5M的linux系统,可以通过apk安装众多软件。

使用阿里镜像

sed -i 's/dl-cdn.alpinelinux.org/mirrors.aliyun.com/g' /etc/apk/repositories

使用科大镜像

sed -i 's/dl-cdn.alpinelinux.org/mirrors.ustc.edu.cn/g' /etc/apk/repositories

相关链接

参考

个人笔记软件比较(Typora+Boostnote+Notable+Joplin)

Typora

  • 存储以及同步方式:采用系统目录,无内置支持,可以直接用nextcloud,坚果云盘存储
  • 标签: 不支持
  • 附件:自定义附件存放位置
  • 开源:否
  • 搜索:不支持
  • 其他:界面美观,支持多种主题,速度快

Boostnote

  • 存储以及同步方式:采用boostnote.json存储虚拟目录,每个虚拟目录对应一个文件夹,文件采用cson格式UUID命名存放,支持多个目录笔记本,可以直接用nextcloud,坚果云盘存储
  • 标签: 支持
  • 附件:独立目录
  • 开源:GPL v3
  • 搜索:支持
  • 其他:美观性一般,速度一般

Notable

  • 存储以及同步方式:采用单一文件夹,markdown格式,标签作为虚拟目录存放在metadata,多笔记支持不够友好,可以直接用nextcloud,坚果云盘存储
  • 标签: 支持
  • 附件:独立目录
  • 开源:1.5 以后已经不开源
  • 搜索:支持
  • 其他:美观性较好,速度较好

Joplin

  • 存储以及同步方式:采用sqlite存储,内置nextcloud,onenote,dropbox,webdav同步支持
  • 标签: 支持
  • 附件:独立目录
  • 开源:MIT License
  • 搜索:支持
  • 其他:美观性较好,速度较好

结论

选择Joplin,内置同步支持,协议开放,插件较多,可定制性高,有浏览器插件和手机客户端。