hosts文件是不允许包含其他文件的,但是可以通过其他方案实现:
脚本合并方法
保存一个hosts.base一个hosts.local,然后通过脚本合并成为hosts文件
搭建本地私有dns服务器
通过bind搭建私有服务器
运维工具同步
通过pssh, ansible 等运维工具同步配置,可以和方法一一起用
hosts文件是不允许包含其他文件的,但是可以通过其他方案实现:
保存一个hosts.base一个hosts.local,然后通过脚本合并成为hosts文件
通过bind搭建私有服务器
通过pssh, ansible 等运维工具同步配置,可以和方法一一起用
/etc/resolv.conf
nameserver 223.5.5.5一般情况下,将 /etc/apt/sources.list 文件中 Ubuntu 默认的源地址 http://archive.ubuntu.com/ 替换为 http://mirrors.ustc.edu.cn 即可。
可以使用如下命令:
sudo sed -i ‘s/archive.ubuntu.com/mirrors.ustc.edu.cn/g’ /etc/apt/sources.list
sudo apt update
sudo apt upgrade新增配置文件 /etc/apt/sources.list.d/pgdg.list,内容:
deb https://mirrors.ustc.edu.cn/postgresql/repos/apt/ focal-pgdg mainbionic可以换成去其他版本号
wget --quiet -O - https://mirrors.ustc.edu.cn/postgresql/repos/apt/ACCC4CF8.asc | sudo apt-key add -
sudo apt-get update
sudo apt install postgresql-12
sudo systemctl enable postgresql
sudo service start postgresql切换到postgres用户并运行psql
sudo -u postgres psql创建数据以及用户账户
CREATE USER c4ys WITH PASSWORD 'c4ys';
CREATE DATABASE c4ys OWNER c4ys;sudo apt-get install software-properties-common
sudo apt-key adv --fetch-keys 'https://mariadb.org/mariadb_release_signing_key.asc'
sudo add-apt-repository 'deb [arch=amd64,arm64,ppc64el] https://mirrors.ustc.edu.cn/mariadb/repo/10.5/ubuntu focal main'
sudo apt update
sudo apt install mariadb-server系统会自动在source.list增加配置,可以将配置移动到单独文件
/etc/apt/sources.list.d/MariaDB.list
deb [arch=ppc64el,arm64,amd64] https://mirrors.ustc.edu.cn/mariadb/repo/10.5/ubuntu focal main
# deb-src [arch=ppc64el,arm64,amd64] https://mirrors.ustc.edu.cn/mariadb/repo/10.5/ubuntu focal mainsudo systemctl enable mariadb
sudo service mariadb start
sudo mysql_secure_installation将python3作为默认Python
sudo apt install python-is-python3 python3-pip
sudo apt install nginx nginx php-cli php-dev php-mbstring php-mbstring php-intl php-xml php-redis php-gd php-fpm php-curl php-bcmath php-zip -y
sudo apt install npm
   function mb_substr_replace($string, $replacement, $start, $length = null, $encoding = null)
    {
        if (extension_loaded('mbstring') === true) {
            $string_length = (is_null($encoding) === true) ? mb_strlen($string) : mb_strlen($string, $encoding);

            if ($start < 0) {
                $start = max(0, $string_length + $start);
            } else if ($start > $string_length) {
                $start = $string_length;
            }

            if ($length < 0) {
                $length = max(0, $string_length - $start + $length);
            } else if ((is_null($length) === true) || ($length > $string_length)) {
                $length = $string_length;
            }

            if (($start + $length) > $string_length) {
                $length = $string_length - $start;
            }

            if (is_null($encoding) === true) {
                return mb_substr($string, 0, $start) . $replacement . mb_substr($string, $start + $length, $string_length - $start - $length);
            }

            return mb_substr($string, 0, $start, $encoding) . $replacement . mb_substr($string, $start + $length, $string_length - $start - $length, $encoding);
        }

        return (is_null($length) === true) ? substr_replace($string, $replacement, $start) : substr_replace($string, $replacement, $start, $length);
}替换样例:
    public function getMaskName()
    {
        if (mb_strlen($this->name) > 2) {
            return mb_substr_replace($this->name, '*', 1, -1);
        } else {
            return mb_substr_replace($this->name, '*', 0, -1);
        }
}替换样例:
    public function getMaskMobile()
    {
        return substr_replace($this->mobile, '***', 3, -3);
}USE information_schema;
SELECT
TABLE_SCHEMA,
TABLE_NAME,
DATA_LENGTH,
INDEX_LENGTH
FROM
`TABLES`
ORDER BY
DATA_LENGTH DESC;USE mydb;
ALTER TABLE mytable ROW_FORMAT = DYNAMIC;
OPTIMIZE TABLE mytable;如果没有 DYNAMIC,那么采用 COMPRESSED 也可以
ALTER TABLE `mytable`
ENGINE=tokudb;ALTER TABLE `mytable`
DEFAULT CHARACTER SET=gbk第一步:登陆进入mysql,并使用 show binary logs; 查看日志文件。
mysql> show binary logs;第二步:查看正在使用的日志文件:show master status;
mysql> show master status;
+------------------+-----------+--------------+------------------+-------------------+
| File             | Position  | Binlog_Do_DB | Binlog_Ignore_DB | Executed_Gtid_Set |
+------------------+-----------+--------------+------------------+-------------------+
| mysql-bin.000005 | 425994852 |              |                  |                   |
+------------------+-----------+--------------+------------------+-------------------+
1 row in set (0.00 sec)
当前正在使用的日志文件是mysql-bin.000005,那么删除日志文件的时候应该排除掉该文件。
mysql> purge binary logs to 'mysql-bin.000005';删除除mysql-bin.000005以外的日志文件。
如果每次等到发现空间不足的时候才去手动删除日志文件,这种方式是很不理想的。
那么,我们就需要设置mysql,让它能自动清理日志文件。
编辑mysql的配置文件,设置expire_logs_days(mysql定时删除日志文件)
[root@sam ~]# vim /etc/my.cnf在my.cnf中,添加或修改expire_logs_days的值 (这里设置的自动删除时间为10天, 默认为0不自动删除)
expire_logs_days=10修改后,重启mysql就会生效。
但是,在生产环境中,重启mysql数据库往往会付出很高的代价。
于是,可以在不重启mysql的情况下,修改expire_logs_days值
如下:
mysql> show variables like '%log%';
mysql> set global expire_logs_days = 10;
设置完后,可以通过 show variables like ‘%log%’; 看到expire_logs_days的值已被修改成10。
注意:通过这种方式设置expire_logs_days虽然不需要重启mysql即可生效,但是该方式在重启mysql之后,值会被恢复。
于是,建议通过mysql命令设置expire_logs_days的同时,也修改/etc/my.cnf下的expire_logs_days=10配置,这样在下次重启mysql的时候,expire_logs_days也一样是10;
各行各业的人都想知道如何解决他们「钱的问题。每个人都隐约地意识到自己想要变得富有,但是他们没有一套好的原则来遵守和践行。
财富不是从别人那里拿走什么,而是为这个世界创造更多
财富创造带来了世界的丰富
每个人都可以变得富有:现实是,每个人都可以变得富有。我们可以看到,在第一世界国家,基本上每个人都比200年前活着的人富有。
我不认为资本主义是邪恶的。资本主义实际上是好的,它只是被劫持了,被不当的外部成本定价所劫持。它被不正当的收益所劫持,在那里有腐败,或者有垄断。
我们是唯一跨越基因界限进行合作的动物,因为我们可以在自愿的交换中追踪信用(credit)和债务(debt)*
自由市场是人类社会固有的:交换就是在记录信用和债务,这是我们作为社会动物与生俱来的本领。
什么让我们合作?因为我们可以记录借方和贷方。谁投入了多少工作?谁贡献了多少?这就是自由市场资本主义。因此,我坚信这是人类与生俱来的,我们将为每个人创造越来越多的财富。
太多的索取者而没有足够的创造者将使一个社会陷入毁灭: 你需要少量的寄生虫来保持健康。任何生物都只能抵抗少量的寄生虫。当寄生元素失去控制时,你就死定了。
生活水平远低于其收入水平的人们享受着一种自由,这种自由是那些忙于改善生活方式的人们无法理解的
社会会因为你创造了它想要、却不知道如何大规模获取的东西,而给你丰厚的回报
钱是社会给你的欠条,你在过去做了一些好事,社会会为你创造它想要的东西而付钱。但社会还不知道如何创造这些东西,因为如果已经被创造了,他们就不需要你了。
技术只是一套还不太管用的东西。一旦某样东西成功了,它就不再是技术了。所以,社会总是想要新事物。
如果你想要变得富有,弄清楚你可以为社会提供哪些它想要、但还不知道如何获取的东西。并且是你感兴趣、在你的能力范围内能提供的东西。想清楚之后,下一步你要考虑如何规模化。因为如果你只造一个,那是不够的。你必须建造成千上万个,上百万个,甚至数十亿个。最好的情况是,每个人都可以有一个。
Naval:它以高端开始。首先,这是一种创造性的行为,你创造它只是因为你想要它。你想要它,需要它,所以你知道如何建造它。其实一开始你是为自己建造它。然后你要想办法把它带给其他人。然后有一段时间,富人拥有它。比如,富人有私人司机,所以规模化需要考虑的是,如何把曾经只是富人拥有的东西给到给每个人。
互联网会给你的小众兴趣找到买单的人
“互联网极大拓宽了职业发展的可能性,但是大多数人目前并没有察觉到。”
互联网最根本的颠覆性是,它使这个星球上的人们能彼此联系,任何一个人只要你想联系总有方法。你要明白,借助互联网,你就总能为你的产品、你的才能、你的技艺找到观众,不论他们来自哪里。
因此,无论你拥有多么小众化的兴趣,互联网都能提供给你一个很好的平台去把它规模化。
正是因为每个人有不同的技能、兴趣,才可以在自己独特的事物上发挥创造力。
互联网可以让你低成本的「走出去」,找到属于自己的观众。然后你通过创建业务、创造产品、积累财富,你通过在互联网上展现独特的你让大众获得快乐。你事业的发展空间就会因互联网而扩大
可以说互联网为各种小众兴趣提供了沃土,但前提是你要擅于将其壮大发展起来。当然,好消息就是每个人生而不同,每个人都有自己擅长的东西。所以要真实做自己。
“通过做自己来规避无意义的竞争”。
所以不要纯模仿,不要纯复制,专注于做自己的事情,当你真正在做自己时,你就会发现没有人能和你竞争,就是这么简单。
因此,你对你自己是谁和你喜欢做什么认识的越深入,你就会面临越少的竞争。也就是说,当你意识到真实做自己没人能和你竞争后,你就能够通过真实性逃离竞争陷阱。
选择一个你可以和长期伙伴玩长期游戏的行业,所有的回报都来自于多次游戏的复利。
你应该选择的行业是,在这里你有长期战友和你玩长期的游戏。
这是解释为什么硅谷会成功,也是对高信任度社会能够成功的深刻理解。事实上,生活中所有的收益都来自于复利。无论是在人际关系中,创造财富中,或是在学习中。因此,复利是一种神奇的力量,如果你以1倍的价格开始,然后如果每年增长20%,并且持续30年,你得到的不只是额外的30年乘以20%。它有复利效应,所以它会增长,增长,增长,最后你得到的回报将会不可思议。不管是善意、爱情、人际关系还是金钱。所以,我认为复利是一种非常重要的力量。
但本质上,如果你想成功,你必须与他人合作。你必须知道谁可以信任,谁可以长期信任,和你一起在游戏中走下去。所以「复利效应」和「高度信任的圈子」就是你在游戏中生存的武器,同时也是在游戏的周期结束时,让你获利的主要原因。
每次你重置时,每次你跳出原来的网络圈时,你都将从零开始。你不知道该相信谁,而且他们也不会很容易相信你。
因此选择一个你能长期从事的行业、以及长期伙伴是非常重要的。这些人会表明他们会在你身边存在很久,他们是有道德的,他们的道德信条能从他们的行动上体现出来。
在长期游戏中,似乎每个人都在让彼此更富有。而在短期游戏中,似乎每个人都在让自己更富有。
“玩迭代游戏。生活中的所有的回报,不论是财富上的,还是人际关系上的,或者是知识上的都来自复利效应。”
在健康和健身方面也是如此。 你的身体越健康,保持健康就越容易。 而你的身体恶化的越多,就越难回到正常的水平。
选择高智商、精力充沛、为人正直的伙伴是你不能妥协的三要素
Naval:在挑选同事方面,选择那些高智商、精力充沛、正直的人,这是你不能妥协的三个要素。
你需要和聪明的人共事,至少他们不是在错误的方向上一路向西。你需要与精力充沛的人共事,因为世界上到处都是聪明却懒惰,光想不干的人。
然后关于精力,很多时候人们对特定的事情没有动力,但对其他事情有动力。例如,有人可能真的没有动力一天都坐在办公室里工作。但他们可能真的有动力去画画,对吧?
我想说的是,做一件事情的动力终究来自于你自己到底想做什么,觉得什么有意义,而不是为了讨好别人。
最后一点是正直,正直是最重要的,如果只有另外两个品质,你就选择了一个聪明、勤奋的骗子,他最终会欺骗你。所以,你必须弄清楚这个人是否正直。
我之前说过,你要通过信号判断。信号是他们做什么,而不是他们说什么。当他们认为没有人在看他们时,他们会做一些非语言的事情。
“委任的关键在于,让人们做他们擅长同时是你想让他们做的事情。”这个道理显而易见,你会和那些自然会做你想让他们做的事情的人合作。
如果你想让人们长期保持动力,这种动力必须是内在的。你不能只是创造它,如果他们没有内在的动力,你也不能成为他们的拐杖。所以,你必须确保员工精力充沛,愿意做你希望他们做的事,愿意和你一起工作,一起创造。
解读信号非常非常重要。信号不是人们说什么,而是他们做了什么。
“自尊是你对自己的评价”。
好人,有道德的人,容易共事的人,可靠的人,往往有很高的自尊,因为他们对自己的声誉非常在意,他们深刻的明白声誉的重要性。
不要与愤世嫉俗者和悲观主义者为伴:他们总是以自我为中心
不要与愤世嫉俗者和悲观主义者为伍。他们总是自以为是。
本质上,要创造事物,你必须是一个理性的乐观主义者。理性的意思是你必须看清世界的真相。但你必须对自己的能力保持乐观,对自己想要完成的使命保持乐观。
我认识的所有真正成功的人都有很强的行动力,他们只是做事。判断一件事是否可行的最简单方法就是去做,至少做第一步,第二步,第三步,然后再决定下一步。
因此,如果你想在生活中取得成功,创造财富,或者拥有良好的人际关系,或者保持健康,甚至是快乐,你需要有一种超强的行动力,这样才能获得你想要的。
你需要在了解所有的陷阱,知道事物不利的一面的情况下,依旧保持乐观。
每个人只在这个星球上活一次,为什么不试着做点大事呢?这就是埃隆·马斯克这种人的牛逼之处,我认为他之所以能激励这么多人,是因为他承担了非常、非常大胆的责任和使命。他为人们树立了一个树立远大理想的榜样。
对于一个人来说,他的境遇是有下限的,但上限却很难说(白话说是你很难饿死,但是成功却不可限量)。因此,适应现代社会意味着要克服你的悲观情绪,做出稍微不理性的乐观押注
“如果你失败了,有什么大不了的?你损失了几百万美元的投资人(VC)的钱,而他们还有更多钱,这就是他们对你成功的赌注。”
对过去悲观是有道理的,对今天保持乐观是有意义的,尤其对于这么多受过高等教育且生活在第一世界国家的人,甚至是第三世界国家的人。我反而认为第三世界国家的经济机会要大得多。
当然,你必须注意的一件事就是,不要做任何违法的事情,远离可能会带来灾难性的损失的事。尽可能不做对身体有害的事情,注意你的健康。远离那些会让你失去所有资本和储蓄的事情。
事实上最有价值的事情不是教来的。要么来源于你的兴趣或DNA,要么是源于你从小养成的一些习惯,这些在之后非常难被“教”会;当然也可能是一些全新的东西,所以没有人知道怎么做;或者在工作培训中也是如此,你在高度复杂的环境中进行各种尝试,在一个特定的领域建立判断。
特殊技能不是教出来的。
你获得的收入=投资培训所产生的回报-培训你的成本。
特殊技能是通过认识到你的天赋、你真正的好奇心和你的热情而建立起来的。不是为了最热门的工作去上学,也不是盲目进入投资人认为的最热门的领域创业。
它也是一些刚刚被发现或者很难被发现的东西。因此,如果你不是100%的投入,其他人会比你做得更好。他们不会比你好一点点,他们会比你好很多,因为现在我们正在运营创意领域,非常适用于复利,适用于杠杆。如果你的杠杆率为1000倍,有人在80%的时间都是正确的,而其他人在90%的时间都是正确的,那么90%的时间正确的人将因为市场的杠杆作用和复利获得数百倍的报酬。因此,如果你想确保自己在这方面具有优势,真正具有好奇心非常重要。
很多时候,它不是你坐下来然后推理的东西,它更多的是通过观察发现的。你几乎不得不回顾自己的生活,看看自己到底擅长什么。
你的特殊技能可能是由那些了解你的人观察到的,而且经常是由那些了解你的人观察到的。
如果说特殊技能可以被传授,那就是在工作中,通过学徒制。这就是为什么最好的企业、最好的职业是学徒或自学的职业,因为这些都是社会还没有弄清楚如何培训以及使其批量自动生产的事情。
特定的技能也往往具有技术性和创造性。它在技术的前沿,艺术的前沿,交流的前沿。
努力在2个或以上的领域做到前25%
因此,不要试图在一件事情上做到最好,这太难了。你需要尝试在三件或更多的事情上做到非常优秀。
最好的方法就是追随自己的内心真正喜欢的事物。在你脑海的某个角落,你会意识到,事实上,这个方面我喜欢,我会留意它的商业方面的可能性。
我认为一个人不要太刻意地开始积累,因为你内心其实是想挑选你最擅长的东西。每个人都有与生俱来的擅长的东西。
因为人类的个性非常复杂,你可能在很多方面都很有天赋。如果把你在这些方面的天赋结合起来,这样你就可以自动地,仅仅通过纯粹的兴趣和享受,在很多事情上,最终达到25%,10%甚至5%的最高水平。
如果你两者都能做到,你将势不可挡
“学会销售(Sale),学会建造(Build),如果你两者都能做到,你将势不可挡。”
总的来说,硅谷的创业模式是最好的。最常见的形式是有两个创始人,其中一个擅长销售(Sale),另一个擅长搭建(Build)。
一个建造者和一个销售者的组合:CTO和CEO的组合。风险投资者和技术投资者几乎心照不宣的尽可能地寻找这种组合,这就是神奇的组合定律。
如果一个人可以同时做到这两者,这才是真正的超能力,我认为在任何领域中真正的巨人就是可以「自产自销」的人。
我认为你可以从建造技能开始入手,并在你人生的早期尽量掌握一定的建造技能。或者你有足够的时间可以专心地学习销售,而且你正好有一定的天赋和亲和力促使你成为一个好的销售者。这样你做事的效果可以翻番。
因此,如果你在这两个领域的十字路口,千万不要绝望。因为你不可能成为最好的技术,也不会是最好的销售人员。但神奇的是,我们再回到斯科特·亚当斯(Scott Adams)的技能组合理论,将两个技能是结合将是不可阻挡的。
从长远来看,那些了解潜在需求产品的人,知道如何建造和销售它的人,最能受到顶尖投资者的青睐。如果他们有足够的精力,他们可以突破任何障碍,做成任何事情。
因此,我认为如果你需要选一个,你可以从建造开始,然后过渡到销售。这是一个比较中庸的答案,但我觉得这奏是大实话。
你应该可以在图书馆中拿起任何一本书阅读
“没有所谓的商业技能。少读商业杂志和商业课程,学习微观经济学、博弈论、心理学、说服力、伦理学、数学和计算机”。
“你应该可以从容的拿起图书馆里的任何一本书来读。”
“阅读比听快,做比看快”。
这有点像第二十二条,阅读是没有门槛的,你可以随时开始,然后不断积累,直到它成为一种习惯。接着,你开始不满足于只涉猎单一的领域。
也就是说,你可以从读小说开始,接着你可以读科幻小说,你可以读非小说,然后你可以读科学,哲学,数学甚至更多。但是重要的是,这个过程是顺其自然非强迫的,读你感兴趣的东西,直到你理解它们。然后你就会自然而然地进入下一步,再下一步。
实际上有些东西你可以阅读,特别是在早期,它会以某种方式对你的大脑进行编程,然后在你阅读的后期,你会根据之前的东西来分辨这些东西是真是假。因此,阅读基础性的东西是很重要的。基础性的东西,是在特定领域最原始(fundamental)书籍,在本质上是经过时间和历史的检验,科学的东西。
比如,与其读一本商业畅销书,不如读亚当·斯密的《国富论》。与其读今天谁写的一本关于生物学或进化论的书,我更愿意读达尔文《物种起源》。与其现在读一本可能非常先进的生物技术方面的书,我只想学习Horace F. Judson的《创世第八天》(The Eighth Day of Creation)。你不必死磕关于宇宙学和尼尔·德格拉斯·泰森和斯蒂芬·霍金一直在说什么的高级书籍,你需要的是拿起理查德·费曼的《费曼讲物理:入门》,从基础物理学开始。
如果你基础打的好,特别是数学、物理和科学,那么你就不会害怕任何一本书。
一旦你用顺从取代好奇心,你就会成为一个顺从的工厂工人,而不再是一个创造性的思考者。你需要创造力,你需要有激励自己的大脑去学习你想要的东西的能力。
数学和逻辑是理解其他一切事物的基础
宏观上的扯淡比微观上的扯淡更容易。
最终一切事物的基础是数学和逻辑。如果你懂逻辑和数学,那么你就有了理解科学方法的基础。一旦你理解了科学方法,你就能理解如何在其他领域和其他你正在阅读的东西中区分真理和谬误。
你真正需要的是算法(algorithm),是理解(understanding)
李小龙“我不害怕那些知道一千种踢腿招式的人,我害怕那些练习了一万次出拳或一万踢腿的人。”
第一,练习说服别人,不断实践怎么讲好一个故事。
第二,深入了解一些技术范畴的东西,无论是学习抽象数学,还是读唐纳德·克努斯关于算法的书,或者听费曼关于物理学的讲座。如果你有实际的说服力,对一些复杂的话题有深刻的理解,我认为你的余生将有一个很好的学习基础。
我认为五个最重要的技能是,阅读,写作,算术,然后加上说服的技巧,也就是会讲故事(storytelling)让别人信服。最后,我还要加上计算机编程,因为它是一种应用形式的运算它能让你在任何领域都能自由的建造。如果你擅长电脑,擅长基础数学,擅长写作,擅长说服,如果你喜欢阅读,你就已经为生活做好了准备。
避开商学院和杂志
你会发现博弈论、心理学、伦理学、数学、计算机和逻辑学中的这些基本概念才会更好地帮到你。这也是我为什么会更专注于基础科学、基础逻辑的原因。
着手做比光想要快得多
这涉及到学习曲线的话题,人们总是想方设法的优化自己的学习曲线。尽管我也是一个播客博主,但我不喜欢播客的原因之一是,播客无法让我最快的获取知识和信息。我是一个很好的读者,或者说是一个很快的读者,我能读得很快,但我只能以一定的速度听。我知道人们听的时候都是二倍速,三倍速,但那时每个人听起来都像一只花栗鼠,很难再回头看,抓重点,很难精确定位片段并记笔记,等等。
同样地,很多人认为他们可以通过观察别人做的事情,甚至通过阅读别人做的事情,变得非常熟练。,因为很多微妙的东西在你真正进入这个行业之前是不会真正懂得的。
学习博弈论的最好方法是自己设计游戏,自己亲身体验。虽然我从没读过博弈论的书,但我认为自己非常擅长博弈论实践。
学习曲线是需要迭代的,而不是重复。
但如果我在商店里每天尝试新的营销实验,我不断地改变库存,不断地改善品牌策略,不断尝试新的讲故事的方法,不断地拓展增大客流量的在线渠道,我试着在不同的时间营业,并且经常有目的地四处走走,和其他店主交谈,拿到他们的书,弄清楚他们是如何经营自己的生意的。真正影响学习曲线的是迭代次数。迭代次数越多,收获的就越多,学习速度就越快。而不仅仅是投入的时间长短的问题。
虽然世界为我们提供着一次又一次做同样事情的机会,但事实上,如果我们能从零开始寻找新的方法,世界会呈现出不一样的精彩。
第一次尝试新事物是很痛苦的,因为你正徘徊在不确定的领域,很有可能你会失败。因此你只需要不断让自己适应频繁的小失败(bleed a little)。
大部分人都不这么做,相反他们每天都在追求着小的胜利,这最终会被证明是不合算的。我想说的是,如果你愿意每天都流一点点血,将来你会赢一笔大的。
其实,这就是创业精神,企业家们每天都在流血(bleed a little)。他们不是在赚钱,他们是在赔钱,而且他们总是亚历山大,因为所有的责任都在他们身上,但是当他们赢了,他们就会大赚一笔,所以总体上来看他们会赚得更多。
勇敢冒险你就会在社会上获得影响力
“拥抱责任,以自己的名义承担商业风险。社会将以责任、公平和影响力来回报你。”
要想发财,你需要杠杆。杠杆来自于劳动力、资本,也可能是通过代码和媒体。但其中的大多数,比如劳动力和资本,必须来自于他人的给予。对于劳动力,必须是有人愿意跟随你;对于资本,必须有人给你钱或资产来让你管理和使用。
所以要得到这些,你必须建立信誉,而且你必须尽可能以自己的名义去做,当然这也是有风险的。所以责任是一把双刃剑。它能让你在事情顺利的时候收获信誉,在事情糟糕的时候承受失败的冲击。
从这个意义上说,那些在各种事物上贴上自己标签的人并不愚蠢,他们只是对自己有信心。
把你的名字公之于众,你就会成为一个名人,而名声也有很多缺点。隐姓埋名、有钱总比穷出名好,但即便是名利双收,也有很多不利因素。你需要在公众的眼皮子底下生活。
一个真正运作良好的团队规模很小,对每一个不同的部分都有明确的责任分工。
明确责任很重要。没有责任感,你就没有动力;没有责任感,就无法建立信誉。但你要冒险,你冒着失败的风险冒着被羞辱的危险,你冒着以自己名义承受失败的风险。
幸运的是,在现代社会,不再有债务人的监狱,人们也不会因为失去别人的钱而坐牢或被处死,但与生俱来的,我们不会以自己的名义在公共场合失败。那些以自己的名义在公共场合面对失败的人,实际上拥有很大的能量。
当你把你的名字放在那里,你就要冒着某些风险。但同时你也会得到回报,你会得到好处的。
当你变得富有时,你会发现这些都不是你一直以来追求的
当你赚了一大笔钱后,你首先意识到你仍然是同一个人。如果你本来快乐,你就还是快乐的。如果你本来不快乐,你就会不快乐。如果你平静、满足、平和,你还是那个人。
“健康的身体,平静的头脑,充满爱的家庭。这些东西是买不来的,必须要经营才能得到。”
即使你拥有世界上所有的钱,你也不会拥有这三样东西。。因此,我认为这三件事——你的身体健康,你的心理健康和你的亲密关系是你必须要培养的。他们能给你带来比任何金钱都多的安宁和幸福。
我想创建一个新的推特系列,来为那些想要一个更平静的内在的人们提供实用的建议。一套理解、分辨半真半假和真理的理论,如果你能正确地吸收它们,这些都是指向你已经拥有的想法和经验的指针;如果你把这些理论慢慢融会贯通,它将帮助你、引导你进入一个更平静的内在状态,这就是我想做的。
我认为,一个充满爱的家庭和人际关系实际上是自然而然地从其他事情中脱颖而出的。如果你有一个冷静的头脑,你已经赚了钱,你应该有良好的关系。你没有理由不这样做,很多离婚都是为了钱,不幸的是,这就是现实,有了钱但是丢失了家庭这部分。
别相信能快速致富的鬼话,那些人只是想从你身上赚钱而已
在某种程度上,每个创始人都要对公司的每个员工撒谎。他们必须让员工觉得,你为我工作比做你自己想做的事,为你自己工作(创业)要好。同样作为一个创始人,但对此我总是很难接受。
于是我开始尝试一些保持诚实的方法,我招募了一些有企业家精神的员工,然后告诉他们,“你们可以在这个公司成为企业家,当你们准备好开始自己的事业的那一天,我将支持你们。我永远不会妨碍你创业。但在你想开始一些新东西之前,这里可能是一个好地方,让你学习如何构建一个良好的团队,建立一个好的企业文化,通过打磨自己的技能找到适合的产品市场,见更多更加优秀的人、和他们交流碰撞,直到最终想通自己到底想做什么。因为定位、时机、以及必要的深思熟虑,在开始创业时很重要。”
“如果你想成为一个哲学家,先当国王,再当哲学家。”不是先成为哲学家,再成为国王。”
找出你最擅长的,并尽可能多地运用杠杆
“产品化(Productize)你自己。”
产品化你自己这个概念的意思是:你自己是独特的、有责任心的,产品化需要独特的技能和杠杆。所以所有这些部分,你可以把它们合并成这两个词。
在这种情况下你不是在刻意赚钱,赚钱甚至也不是一种技能。你就是在做你自己,探索成千上百种方式找到真正的你。
“找三个爱好”。一个能让你赚钱,一个能让你保持健康,一个能让你富有创造力。”
找到三个爱好,一个让你赚钱,一个让你健康,一个让你更聪明。
https://github.com/taosue/how-to-get-rich-without-getting-lucky/blob/master/README.md
使用Python编写,可以设置源码目录,排除目录,收集文件类型,输出目标文件,是否允许空白,编码等。
使用示例:
python zhuzuoquan.py -s D:\pythoncode\projectname \
-e debug,release \
-t .h,.cpp \
-en gb18030 \
-o result.txt
zhuzuoquan.py 代码
#!/usr/bin/python
# -*- coding: utf-8 -*-

import argparse
import os

parser = argparse.ArgumentParser(
    description='著作权代码收集工具', usage='''
    zhuzuoquan.py -s 源码目录 -e 排除目录 -t 文件类型 -o 输出文件
    ''')
parser.add_argument('-s', help='源文件目录', required=True)
parser.add_argument('-e', help='排除目录,多个用半角逗号分割', )
parser.add_argument('-t', help='扩展名,多个用半角逗号分割', required=True)
parser.add_argument('-o', help='输出文件')
parser.add_argument('-el', help='允许空白行')
parser.add_argument('-en', help='编码', default='utf-8')

def filter_files(root_dir, excluded_dirs, allow_types):
    valid_files = []
    for root, dirs, files in os.walk(root_dir):

        for f in files:
            excluded = False
            p = os.path.join(root,f)
            d = p[root_dir.__len__():]
            for ex in excluded_dirs:
                if d.startswith(ex):
                    excluded = True

            allow = False
            for t in allow_types:
                if f.endswith(t):
                    allow = True
            if allow and not excluded:
                filepath = os.path.join(root, f)
                valid_files.append(filepath)
    return valid_files

if __name__ == '__main__':
    args = parser.parse_args()

    if args.e:
        excluded_dirs = args.e.split(',')
    else:
        excluded_dirs = []

    allow_types = args.t.split(',')

    root_dir = args.s

    output_file = args.o

    allow_empty_line = args.el

    encoding = args.en

    files = filter_files(root_dir, excluded_dirs, allow_types)
    total_files = total_lines = 0
    if output_file:
        with open(output_file, encoding=encoding, mode='w') as op:
            op.write("")

    for f in files:
        total_files = total_files + 1
        try:
            with open(f, encoding=encoding) as fh:
                content = fh.read()
                if not allow_empty_line:
                    content = "\n".join([s for s in content.splitlines() if s.strip()])
                lines = len(content.splitlines())
                relative_path = f[root_dir.__len__():]
                print(relative_path, lines)
                total_lines = total_lines + lines
                if output_file:
                    fh.seek(0)
                    with open(output_file, encoding=encoding, mode='a+') as op:
                        op.write(relative_path + ":\n\n" + content + "\n\n\n")
        except:
            pass

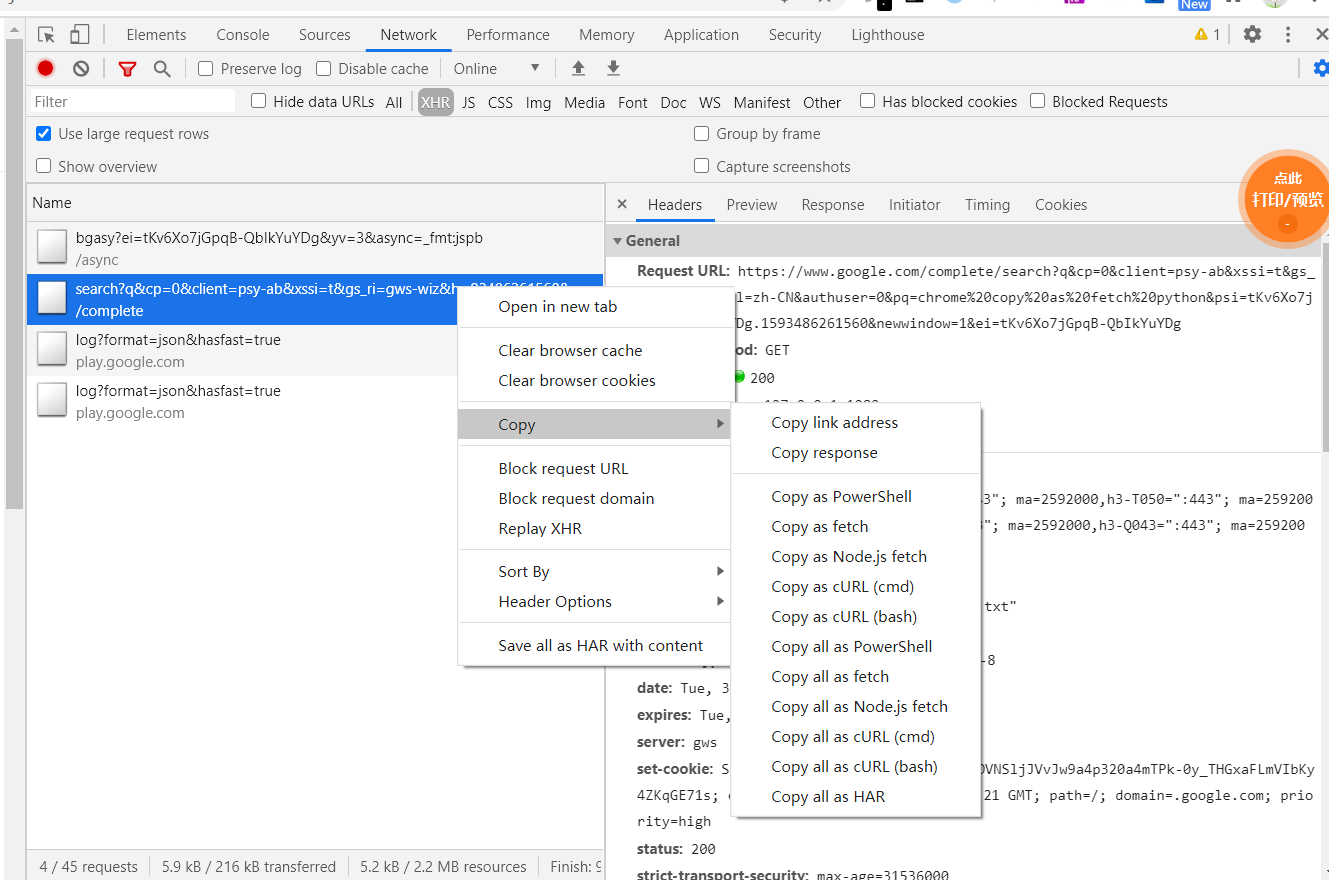
print("Total: files %d, lines %d" % (total_files, total_lines))chrome提供了非常方便的复制功能,可以将页面请求复制为curl命令行或者nodejs fetch等。那么,能不能得到其他比如PHP,Go,Python版本的代码呢?答案是可以,且只需两步。
在 Chrome 开发工具的网络选项卡中,右键单击请求,然后单击“复制” > “复制为 cURL (命令)”。

得到
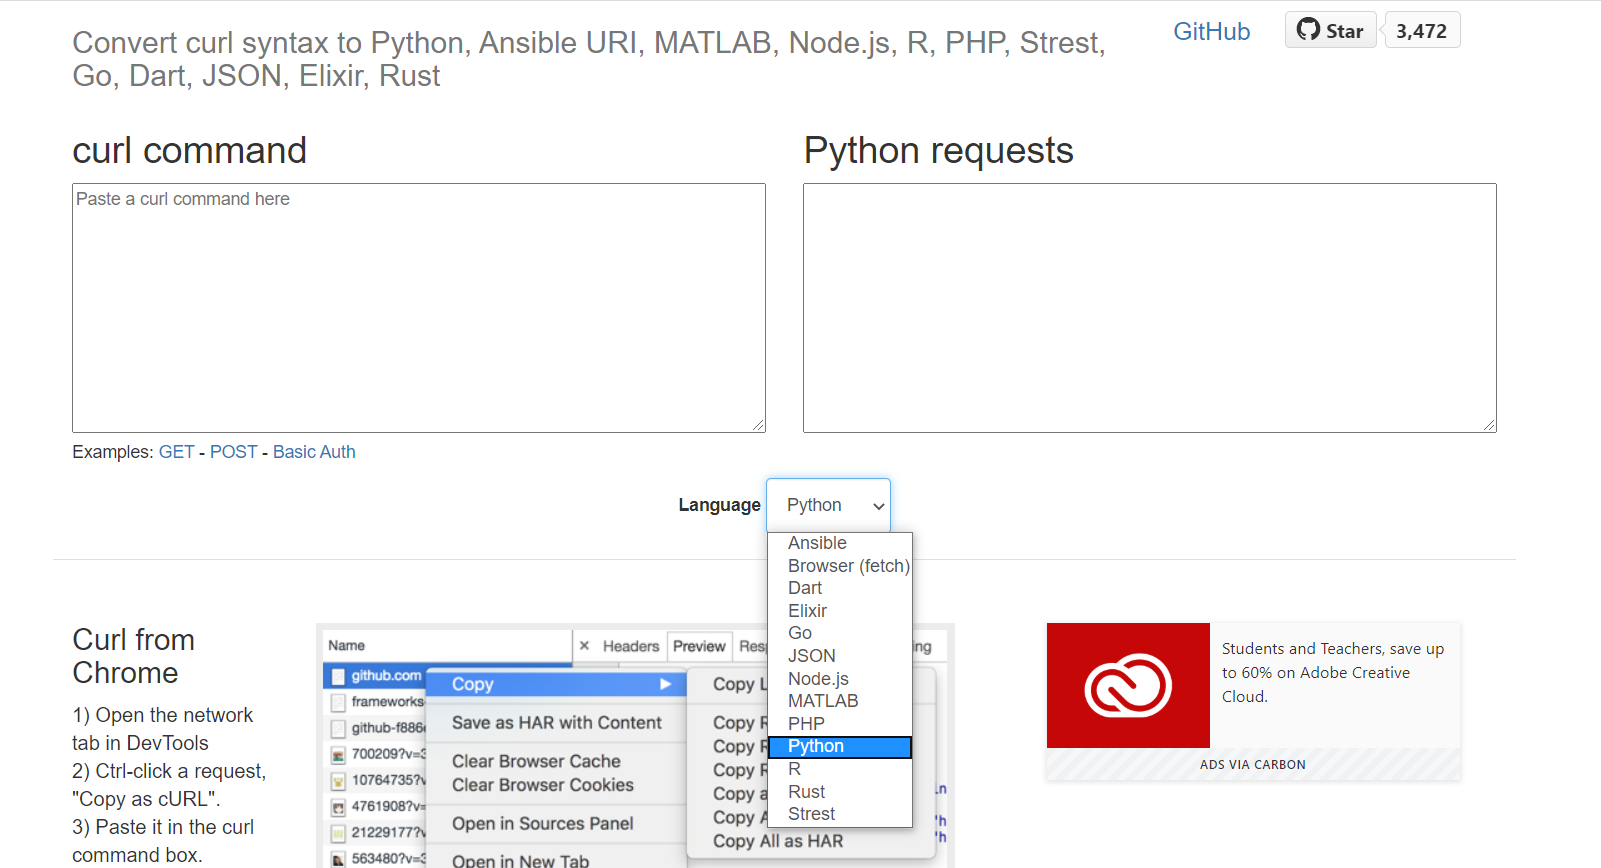
curl 'https://c4ys.com/' -H 'authority: c4ys.com'...浏览器打开 https://cURL.trillworks.com/ 就可以将 cURL 命令转换成 Python、 NodeJS 、Go、 PHP等十多个语言版本了。

统计代码行数
find  . \
\( -path ./web -o -path ./runtime -o -path ./config \) -prune -o \
\( -name "*.php" -o -name "*.js" -o -name "*.css" -o -name "*.scss" \) \
| xargs wc -l
web,runtime,config为需要排除的目录
php,js,css,scss为源码文件扩展名
Disable hyper-v (which will required a couple of restarts)
dism.exe /Online /Disable-Feature:Microsoft-Hyper-VWhen you finish all the required restarts, reserve the port you want so hyper-v doesn’t reserve it back
netsh int ipv4 add excludedportrange protocol=tcp startport=50051 numberofports=1Re-Enable hyper-V (which will require a couple of restart)
dism.exe /Online /Enable-Feature:Microsoft-Hyper-V /Allwhen your system is back, you will be able to bind to that port successfully.